Our last long driving day of the trip was also our last planned scenic day. Mono Lake is just a short drive up the highway from Bishop so we intended to stop there on the way out since we both had seen so many pictures from the lake and I've driven past a couple times but had never stopped. We had considered a stop in nearby Bodie, a huge ghost town just north of the lake but it's easily a full day to do it any sort of justice so that will have to wait for a return visit (with more appropriate wheel/tire combo apparently).
Mono Lake is famous for it's iconic Tufa Towers which are columns of deposits left behind when the water level receded. They're calcified and freestanding and give a very alien landscape appearance. We headed to the south tufa formation and got to drive down another well graded gravel road to the visitor center. After hiking through the formations there we headed over to Navy Beach which was down a slightly less maintained, single lane, gravel road where we got to chase a jack rabbit for a bit. Some of the Tufas at Navy Beach were made of sand and had a much different appearance and these are apparently very fragile too. This beach provided a great spot to get panoramic pictures with the lake and tufas in the foreground and the mountains in the background.
Back in the car we still had about 450 more miles to drive and it was already about noon. We made our way back into Nevada for a bit and stopped for lunch in Carson City, where we saw a TTS convertible. Not many TT sightings since we had left TT-West the week before. Carson City to Susanville isn't especially interesting but from Susanville to Ashland we were going through Lassen National Forest which I've always loved. This takes you through dense forest with some volcanic scenery mixed in. As Russ put it though, as you continue driving it feels like someone is adding highway ahead of you and that you'll never make it to I-5. It didn't help that this was heavily patrolled by the CHP and we were getting sporadic laser hits from someplace too. We did finally get to I-5 and made the last 70 or so miles up the highway back to Oregon and landed in Ashland,
We wandered down the street from our Best Western to the Ashland Springs Hotel, where we had stayed for TT-West way back in 2007 on my last sabbatical, and had another excellent meal even though it was the last one served for the night since we got in so late. I have to say that I'll miss being able to walk from the hotel down to a restaurant and back. At home we can walk to a Mongolian or Thai place and that's really about it.
Ashland was our last real vacation day as our next stop would be home. We started the next morning off with a coffee stop in nearby Talent with Russ and then it was back on I-5 for the familiar slog through traffic back to Portland. Although it was probably our shortest driving day of the trip I think it felt like the longest. Some day we'll have to find a more scenic way to bypass the interstate back to home.
All told we traveled 3800 miles across 6 states and consumed 145 gallons of gas. I've got about 1200 pictures to go through and several videos so that should keep me busy until the next trip in July :)
Friday, June 7, 2013
Ghost Towns, Brothels and Vegas
From Flagstaff we had a long drive ahead of us to get to Bishop on the California/Nevada border with no scenic stops planned to break things up. We started back out on I-40 and made good time getting to Kingman and I'm glad we didn't end up staying there, Flagstaff was much nicer :) At Kingman we turned northwest and headed towards Vegas. We passed by the Hoover Dam but did not stop and the way the road is configured now you just get to see a glimpse of Lake Mead but not the Dam itself. In Vegas we tracked down a California/Nevada staple for lunch, In-n-Out! I had been to one before but this was Danielle's first visit so we ordered up a couple double-doubles with fries. I think I prefer the burgers to Five Guys but Five Guys has better fries.
From Vegas we had a long death march up 95 with occasional scenic views such as the Shady Lady Brothel, seriously. I tried to pass the time on 95 as quickly as possible when the traffic cooperated while Danielle played Plants vs Zombies. Eventually we got to Hwy266 which I assured Danielle was a short cut that I had possibly taken before and I was pretty sure was not going to turn into a gravel road. It turned out to be a great short cut with the scenery changing from desert scrub brush with Joshua Tree looking cacti with the Sierras building in the background. Along the way we drove past the ruins of the mining town in Palmetto, originally settled in 1866 and having been revived a few times later to fail quickly each time. We pulled in and wandered around taking pictures and met a gentleman from Fresno who was doing a ghost town loop of the area which sounds like a lot of fun actually.
After our unexpected scenic stop of the day we got back on the road towards Bishop and eventually turned off onto Hwy168 and that's where things got more fun. There are two tight and twisty passes on the road and the whole thing is up and down through dips with camber changes all over the place, sometimes at the top of a hill mid-corner! Danielle filmed most of this on the iPhone and viewing it will probably require Dramamine :)
It took a bit of searching for our hotel in Bishop, the Creekside Inn, mostly because it didn't seem like there was a creek anywhere in town. Eventually we found it right there on Main Street and got checked in. Just down the road from the hotel was the Whiskey Creek restaurant where we were again treated to an excellent meal followed by an epic white Russian Tiramisu. We had a long day planned for our final real driving day so it was once again early to bed for an early start.
Thursday, June 6, 2013
Someplace new
Lots of friends have told me I should visit Sedona but I've never quite made it to that part of Arizona in any of my past trips. This time we had a full day to check out Sedona, the local parks and take a drive to a ghost town.
I had been advised that the state highway down to Sedona was a much better option than just taking the interstate so we started the day back on highway 89, which we had already covered many miles on back in Utah. The drive takes you through a dense forest, through an epic twisty mountain pass (driven at Miss Daisy speeds due to traffic) and then as you emerge on the other side you start to get back to red rock and more open vistas. Sedona itself is split into the olde town up north and then a much larger more recent development further west. We stopped in the old section for some lunch prior to heading out for our hikes. Once again urbanspoon, or maybe it's Apple maps, failed us by recommending a restaurant that was supposed to be right where we parked but instead was located all the way in new Sedona. No matter, we wandered down the street and found the Cowboy Club. We decided on a trio of appetizers for lunch instead of a full meal; prickly pear cactus fries, rattlesnake skewers and nachos. Everything was fantastic and the rattlesnake really did kind of taste like chicken, but better I think. We'll have to see if the local Whole Foods ever stocks it :) We stopped short of ordering dessert and headed out for our scenic point of the day, the Red Rock State Park and Cathedral Rock.
The part doesn't have any seriously long hikes, just a few trails to wander through the woods by the stream to get some good pictures of the formations. We did hike in the stream for a bit although it was really only ankle deep so not quite like the Narrows. We had heard that there was a local Vortex although I didn't really notice anything, we need to visit the Oregon vortex for comparison. What we did find though were lots and lots of stacked rock cairns. Usually you'll find a few of these along a trail to mark the route but here they were everywhere, fields full of them, on tops of trees, even hanging from trees... it was a bit creepy and maybe if we were hiking at dusk it might have had a Blair Witch vibe to it. I managed to build a couple of my own stacks and I'd like to think it was my own balancing skill and not the vortex that was holding them up.
Our next stop of the day was the ghost town of Jerome, although really this was just a drive-thru and not a stop since our real destination was the stretch of Hwy89A that connects Flagstaff with Prescott. Predictably we got stuck behind slow traffic on the way south but once we got turned around on the far side we had a pretty good run with no traffic and when we did catch up to two cars they both were kind enough to let us pass and continue at our own pace, which was maybe a bit more rapid than they were moving :) This is an exception stretch of road though. It climbs back up to Jerome hanging off the side of the mountain and following the contours the whole way. Every turn you make has you looking past the guardrail and straight off into space since you're overlooking the valley below the whole time. Eventually you come around the final turn and you're suddenly back in Jerome. Jerome is a neat place although we didn't really stop to explore. It's an old mining town built at the top of the mountain and the entire town is built amid the switchbacks with lots of elevation between each street.
It seemed like there were some good restaurants in town but we decided to head back down Sedona for dinner. This time we ended up at Sound Bites and were able to sit on the terrace and enjoy the sunset, and some live music, while we ate. On the walk back to the car we stopped off first for some prickly pear ice cream and finally at a chocolate shop where we loaded up on fudge, homemade peanut butter cups and cherry cordials. Our drive back up to Flagstaff was again fairly spirited as we attempted to keep up with someone who must have had some local knowledge as he was flying! I decided against trying to keep up with his SUV (!) and we enjoyed a more leisurely pace the rest of the way back to the hotel in Flagstaff.
Change of plans
So since we had funky water at the hotel in Chinle we revised our plans and so we needed to see all of Canyon de Chelley in one day and then make our way all the way over to Flagstaff, about halfway across Arizona. Since there's only one short hike in the park this seemed like a pretty easy day.
We headed in to the park and straight to the south scenic drive and the White House ruins hike. Canyon de Chelley is all Navajo lands and not a full on national park. The scenic viewpoints along the canyon rim are all within the national park but the valley floor is all protected land, with the exception of the White House ruins hike. This would be a pretty similar hike to the Cassidy Arch trail from Capitol Reef except it starts at the top and heads down to the valley below and leaves you with a nice climb for the hike out :) We made it down pretty quickly, yay gravity, with plenty of stops for pictures along the way as the scenery changes as you descend and make your way across the canyon walls. Then it's just a short walk to the ruins which are tucked in under a huge sheer wall. The ruins are fenced off so you can't get too close but someone has kindly located rocks along the fence at strategic locations so that it's easier to get pictures over the fence. The sky was pretty overcast so I didn't take too many pictures and well, not much has changed since the last time I visited anyway :)
The hike back seemed much longer as we made our way back up to the top. The skies had cleared enough for it to start to get hot but not enough to get us clear blue skies for pictures. We took it fairly easy and eventually got back to the car a bit winded but ready to see the rest of the park. We headed all the way in to the end of the loop drive to see the Spider Rock formation, named after the Spider Woman legend. From there we worked our way back to the visitor center stopping at overlooks to get pictures of the valley below and often with ruins way across the other side of the canyon. Next up was the north loop which I had not seen on my previous trip. We hit all of the viewpoints there and there were much better views of the ruins below although you're at least 500ft up so you can't get up close and personal. I think next time we're in the neighborhood we'll do one of the guided tours of the valley so that we can see more.
After packing back up we headed out of Chinle, south towards I-40. This would be the first time we were back on dual carriageway since the start of the trip but we were looking forward to being able to cover ground quickly. This was a pretty short drive, just 3hrs but since we got a late start we stopped at Denny's for dinner in Holbrook, seriously one of the friendliest places on the trip. The rest of the drive we were able to enjoy the sunset which helped pass the time since there's not much else to see on I-40 :) We got checked into the hotel, conveniently located for the next drive, and crashed for the night.
Thursday, May 30, 2013
New old places
My last time at Capitol Reef I had seen the start of the Cassidy Arch trail but decided against it because of the nearly 1000ft elevation gain. This time though, as we were deciding which hikes to do Danielle suggested we give it a shot.
The hike starts from a parking lot down the Grand Wash and heads up a steep trail over slick rock and broken rock formations. This is my favorite kind of trail because in many places there isn't a well defined trail so you can kind of pick your own way through and it feels a bit more like canyoneering. There are amazing views down into the valley as you ascend and wind your way down the trail, the views changing and opening up new angles below. There are also varied and interesting rock formations and details along the trail itself so we of course stopped for lots of pictures.
Eventually we rounded a bend and could finally see the arch itself perched out on the corner of the canyon, overlooking the road to the Grand Wash 500+ ft below. Up ahead of us was a group with climbing gear and as we got to the arch they were getting setup to rappel down into the pit below the arch. We sat and watched a few go down and I tried to lean over the edge and see down to the bottom but I never could. We took a few final pictures and had a light snack and then headed back as it was starting to get cloudy.
After the hike we took the scenic drive down to the end of the paved section and got pictures of the various rock formations along the way. We finished our visit with a couple of root beers and a peach cobbler at the general store.
That was all just the first part of the day. On the way out of the park we stopped off to see some of the petroglyphs along Hwy24. They really do look like aliens. From there we traveled on to Hwy95 which would take us the rest of the way to Chinle, AZ. Hwy95 cuts through the Glen Canyon scenic area after a long drive across a fairly boring trek. The Glen Canyon bit was awesome though, We were able to make up a ton of time carving through the quicker bends that arced back and forth through the canyon. We emerged on the other side and traversed a forested mesa where we cruised with virtually no other traffic. Eventually we dropped down into Blanding where we had dinner at a combination gas station/convenience store/bowling alley/A&W. Really.
The last 120 miles into Chinle went by quickly and we settled in to the hotel shortly after sunset. As we were unpacking we discovered our water was brown and a call to the front desk confirmed that was pretty much just the way it was in town. Our original plan was to spend two nights in Chinle but we quickly reevaluated that and decided that spending two nights in Flagstaff would solve a couple of problems, it would get us some cleaner water and give us more time to spend in Sedona. I rebooked the hotels and we hit the bed ready to hike Canyon de Chelley in the morning.
Bonus park day
Our original plan for our last day in Zion was to hike a bit in the morning and then head to Capitol Reef with enough time to catch the sunset. Since we were both a bit worn out from The Narrows while we decided to head out of town early instead of hiking. We did get to have a bit more fun in the Mt Carmel tunnel on the way out and maybe there are a few more 5 cylinder fans out there now :-)
Since we had some extra time and since it was on the way we decided to stop at Ruby's Inn outside of Bryce for lunch and then do a quick tour of the park. Ruby's is always an interesting place to visit and they had a pretty decent buffet lunch too. The park was very crowded and the rangers were closing viewpoints as the parking lots filled up. We did manage to get in to Sunset Point and Fairyland. We hadn't figured on hiking much so just did a quick walk down the paths to get some pictures. Still though, it was nice to get back to see the Hoodoos.
Leaving Bryce we continued on Hwy12 through Escalante and the Dixie National Forest where we drove through alpine passes as the red rocks gave way to aspens. As we got closer to Torrey we ended up in a pack of sport bikes and got to play with them through the twisties for several miles on the way down Hwy12. I think they were surprised that they weren't able to pull away from us and we got several thumbs ups as we pulled in to town. It was a very entertaining end to the drive.
We checked in to the Best Western in town, again with fantastic canyon views from our balcony and then went to get food. We were using UrbanSpoon for recommendations and had picked out the Rim Rock restaurant. After heading towards town we decided we should call them and it turns out they were right across the street from the hotel, yay technology! We ate outside with views of the canyon with the early evening sun and the food was outstanding too.
We headed into the park and eventually found the Sunset Point trail I had been to last time and settled in to take pictures. Even after the sun had slipped below the horizon we were still able to get some pictures on the way back to the car. We capped off the day with a return trip to the Rim Rock for some apple pie desserts.
Wednesday, May 29, 2013
Wall Street
For our final full day in Zion we knew we had to do the Narrows hike. We stopped at the Zion Adventure Company to get some waterproof footwear and walking sticks and then we were back on the bus. The park was much more crowded today since it was Memorial Day weekend so it took longer to get a shuttle out of the visitor center. Once we were on our way we noticed that everyone seemed to be staying on the bus. The Narrows hike is at the last stop and that's where everyone was headed.
First though you need to walk down the river walk which is an easy mile hike. Once at the end you just hop in the river and keep going! The water was a surprisingly warm 58 and it only got as high as waist deep a couple of times. The rest of the hike was just knee deep and the current was fairly weak too. We hiked the two miles up canyon to the Orderville fork which is really where Wall Street, the narrowest part of the canyon, begins. When I hiked here last time I turned back before this section so it was nice to make it this time. We continued on through Wall Street where the canyon is only about 20ft wide all the way to where it begins to open back up. At that point we had been hiking for about 3hrs and we were both having knee issues so we decided we should turn back since we had to hike all the way back out. It was nice being much further into the canyon since the crowds had thinned out considerably.
The hike back out went much faster since we were taking fewer pictures and we didn't have to fight the current. Then it was just the last mile of the river walk to get back to the shuttle.
We went to Oscar's for dinner since they were rumored to have good burgers and we were not disappointed. These were life changing good burgers :-) Danielle's had pastrami and mine was loaded with bacon, cheese and all the usual fixings. Since we ate late we thought we had just missed the last shuttle in town so we started walking back to the hotel. It turns out there was one more shuttle so we could have gotten a ride but after about 8 miles of hiking the walk through town was pretty easy. We both crashed pretty quickly with plans for an easier day.
Trading horsepower for mulepower
We were staying at the Driftwood Inn just outside of the park and our room balcony overlooked the canyon walls so that seemed like a good place to plan the activities for the day. We got all of the gear together and headed out to the shuttle stop for the ride into the park. It wasn't very crowded yet as we went through the visitor center.
We had noticed a very short trail from the visitor center up to an archaeology site and decided to check that out first. It turns out that there used to be a few buildings at the site but those have been buried or torn down. Since that wasn't very interesting we hopped on the park shuttle and headed to the Emerald Pools trailhead at the lodge. As we were crossing the river we saw the corral and booked a trail ride for the afternoon, that would give us enough time to hike the Pools and grab a snack for lunch.
The Emerald Pool trail is usually pretty crowded since it's a relatively short hike but as we got to the second and on to the upper pools the crowds thinned out. There was still a good amount of water in the pools so we got some good pictures of the water cascading down to the lower pool.
Back at the lodge we grabbed a light snack and then went back to the corral for our ride. There was one other couple with us and we got our trusty steeds assigned. Danielle was on a horse named Nava-joe and I got a tall mule named Leggs, I was assured that I would have a great view. It was nice to sit after the morning hike and Leggs seemed to know the way so I could relax and enjoy the scenery. This was a fun outing though and provided a different perspective of the park.
We still had most of the afternoon left so took the shuttle to Weeping Rock, one of the other short trails in the park. I tried to convince Danielle to continue on to the Hidden Canyon trail but she said no :) Weeping Rock is at the end of the canyon so you get fantastic views of the cliff faces on both sides.
With just a bit more time before we needed to go back to town for dinner we decided to make a final stop at the lodge and grabbed ice cream cones to eat on the lawn under the shade of the big tree.
The group dinner was back at the Majestic View hotel and we had a pretty good buffet dinner before retiring to the hospitality suite to cap off the day.
Playing catch up
We were up early for the driver meeting ahead of the group drive from Page to the Grand Canyon but since we had missed Antelope Canyon the day before we decided to start there and meet up with the group later.
We were able to head out on the first tour of the morning and the ride in the back of the pickup truck down the wash was as terrifying as I remembered :) Our tour guide showed us where all of the beautiful pictures were and told us many tales of snakes, spiders and floods. It was already quite windy too so there were several sand showers as we hiked through the canyon.
Back at the parking lot we were leaving Page about 2hours after the main group. Luckily we had very little traffic in transit to the Grand Canyon and we were able to run at our own pace through the twisty highways from Kanab to the park. We did stop off for lunch in Jakob's Lake for lunch and fuel too. When we arrived at the park the rest of the group was just about to head on to Springdale so we were able to make up about an hour.
This was my first visit to the north rim and it is so very different from the south rim. The initial drive in feels much more like driving into Yellowstone, except for the lack of buffalo. There are much fewer viewpoints at the north rim too but we did hike out to the Bright Angel Trail which gives you views down the length of the canyon. It was very, very windy along the exposed trail which made things more interesting but we still got a lot of great shots before heading back to the car. We were still about an hour behind the main group so we were thinking we could possibly catch them at their planned fuel stop in Kanab.
We had another fun drive back out of the park with very little traffic but we couldn't quite catch the group. We did have a very nice drive through the east section of Zion on the way to Springdale, Danielle's first time into the park too. We got into a bit too much traffic to play too much in the Mt Carmel tunnel but I'm sure the cars around us have a new found appreciation for five cylinder engines :)
As it turns out we only missed the main group by a couple of minutes after all, but we did have fun trying. We crashed pretty early after dinner with plans to get an early start in the morning.
Monday, May 27, 2013
Our second day would take us from Provo to Page where we would sync up with the TT-West group coming in from Cortez. This was a relatively short drive day split between interstates and more scenic highways. We did get our first taste of high speed cruising on I-15 where there are a couple of autobahn-like 80mph zones. We spent most of the remaining miles on Hwy89 which we would retrace a couple more times over the coming days.
We arrived in Page early so headed straight down to the Horseshoe Bend overlook just south of town. I remembered there being an uphill hike through sand but I had forgotten that the first hill wasn't the actual viewpoint but instead you needed to hike out pretty far across a sandy slope to the edge of the cliff. This was also our first exposure to wind blown sand that would be a recurring theme for the trip. Eventually we did make it to the overlook and it was as good as I had remembered. We got lucky and made it to the viewpoint between large groups so we could enjoy the view and had our pick of photo spots.
We headed to the hotel where we planned to check in and unload the car so that we could do a late afternoon tour of Antelope Canyon. Unfortunately there was a delay getting in to our room so our schedule got a bit messed up. By the time we made it out to the canyon the tours had ended for the day. We made our way back to the hotel for dinner and an evening on the patio with the TT-West group.
Sunday, May 26, 2013
sabbatical redux
6 years ago I took an extended road trip that went from Portland, OR to Portland, ME and eventually made my way to the national parks of the southwest. This week Danielle and I set off to revisit some of these same locations, well revisit for me but all new to her. We started with a long first day from Portland to Provo, about 12 hours and 800+ miles. This is the first long trip in the RS too and I have to say it's a fantastic cruiser, even better than the mk1. I wouldn't say I felt ready to keep driving when we reached Provo but I felt much less fatigued than on other trips.
Getting to the hotel in Provo was rather interesting too. I had checked the location on Google prior to leaving and noted that it was at exit 265. Well after getting off the freeway at that exit there were no hotels to be found. Checking Google again, yay iPhones,we realized it was on highway 265 which was really exit 269. Really just dumb luck that we landed that close to it at all! Then, once we found the hotel there was the matter of actually getting in the parking lot. We eventually checked in and crashed around midnight local time.
The other thing we had issues with was the gopro. I had planned to have it setup on the windshield taking pictures every 30 seconds so that I could make time lapse videos of the entire drive. Unfortunately, it kept overheating and discharging the battey so that didn't work out so well. We did manage to get most of the first day though.
Provo is really our only long haul travel day so it should be more interesting from here.
Sunday, May 12, 2013
Fuel door replacement + protective rubber bib
A few months back I managed to narf the aluminum trim on the fuel door while getting gas. I figured that rather than risking this happening again (since it is an expensive part) that I'd better add some protection. I've seen rubber bibs like this before, I think Griots used to sell one, and my local modding expert has thrown a few of these on his cars as well. So after getting the replacement door from Genuinue Audi Parts and a section of rubber from Ace Hardware (4" x 8" x 1/16") it was time to perform surgery.
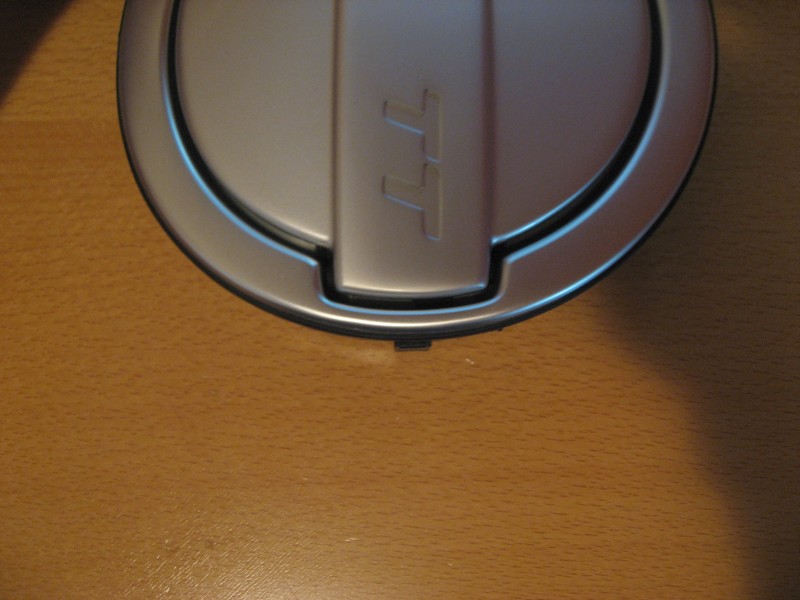
Here was the original damage... This is available for sale if someone wants a spare door to paint, powdercoat, or wrap.

Removal of the door is trickier than I thought it would be. I had done the same replacement on my mk1 and that was a bit easier to deal with.
I prepped the area first to protect the paint and the fuel door, using 3M painters tape and a couple of Griots fender cover blankets.
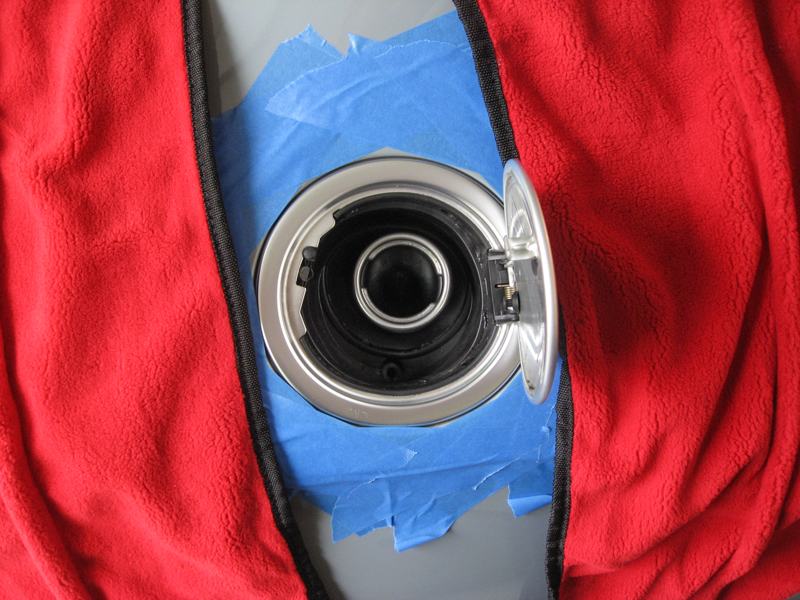
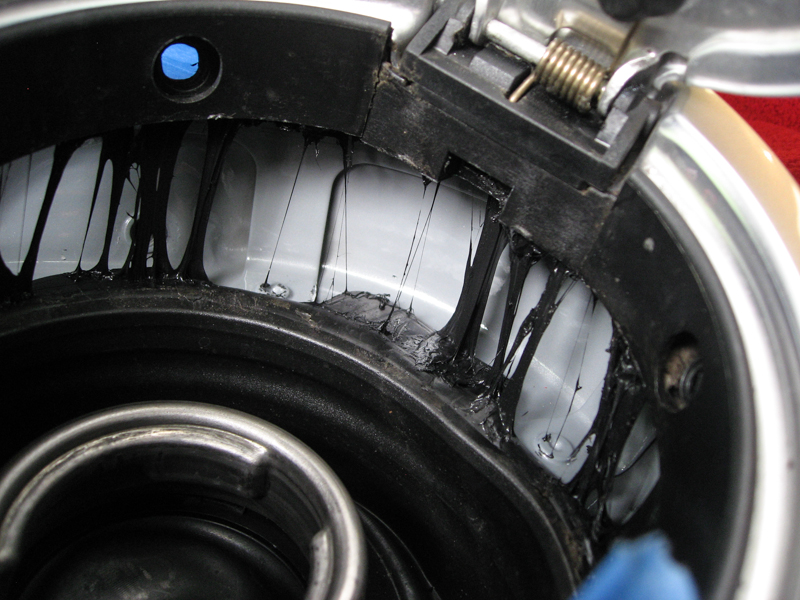
There are three 3mm allen bolts holding the door to the body, three tabs that hold it down flush with the body and some of the famous black German body glue. The glue doesn't really do too much but one of the tabs needs to be retracted to release the cap.
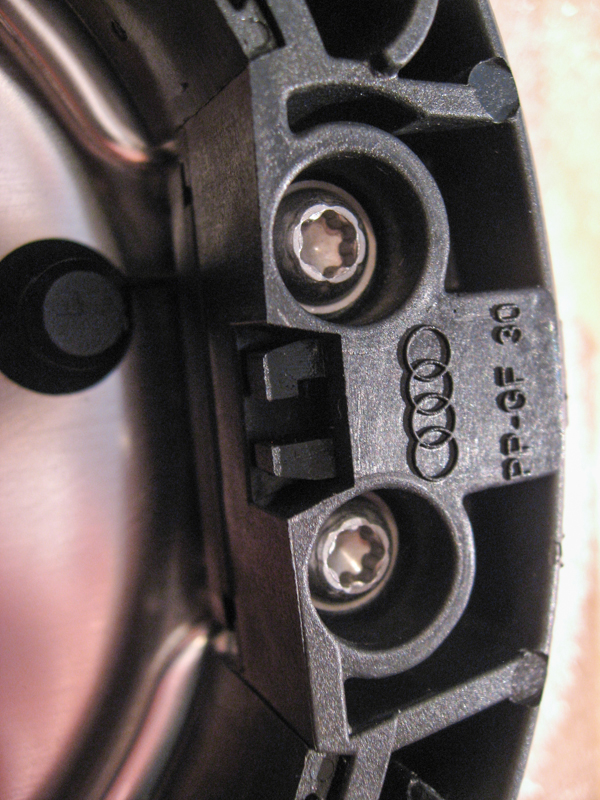
Start with the three 3mm allen bolts first. These come out relatively easily, you may need to remove the gas cap to get the right angle on the top bolt. These were a bit rusty from exposure to fuel, even with just 18k miles on the car.

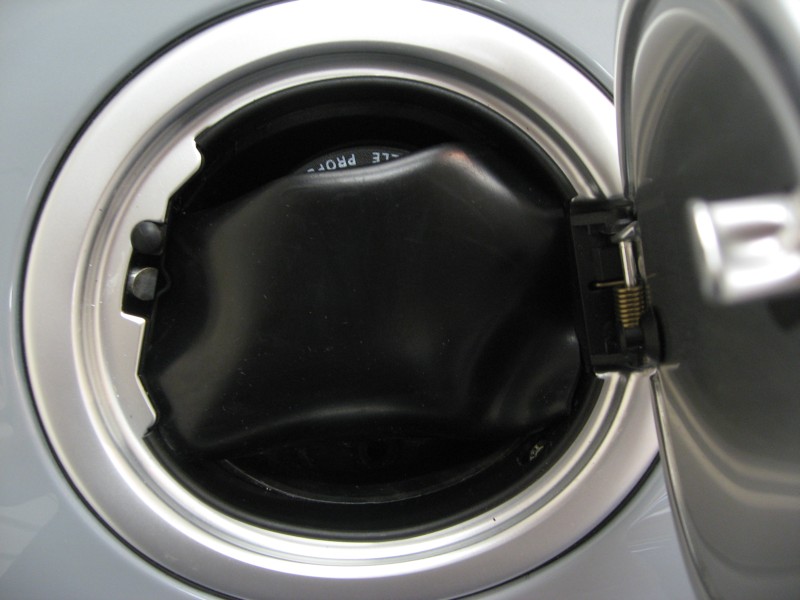
I was able to get a small pry tool in to start to lift the door but it was obviously held in place on both ends and wouldn't just lift out. To the front of the car is the tab that needs to be retracted and at the back is the release cable assembly. Here are the small rear tabs, if you open the door they are basically in line with the plastic inner trim, at about the 8 and 11 o'clock positions.
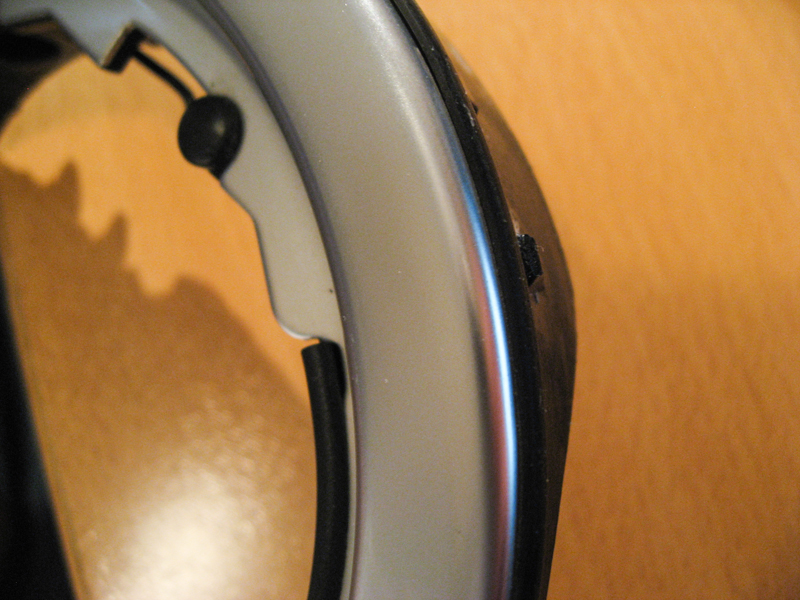

These along with the catch mechanism mean that the front edge has to come out first. To do that the retractable tab needs to be retracted :) If you look at the base of the hinge you can see the end of the tab that you pull on. It's designed to have a small hook tool inserted to pull it outwards which pulls the tab in away from the body. Here's a view looking down at the top, the tab does not stick out very far but there's really no way to force this out around the body.
I tried to pull the catch mechanism with a hook and that seemed to work ok but I ended up cutting a small allen key down to make something that was closer to the tool shown in the manual. On my first attempt I thought I had it pulled all the way out but the cap still wasn't free. I pushed it all the way back in and then pulled it back out and it released on the second try. Here you can see the catch from below.
Some gentle prying should lift the cap out now and you'll get a trail of the glue, it's pretty easy to clean up though.

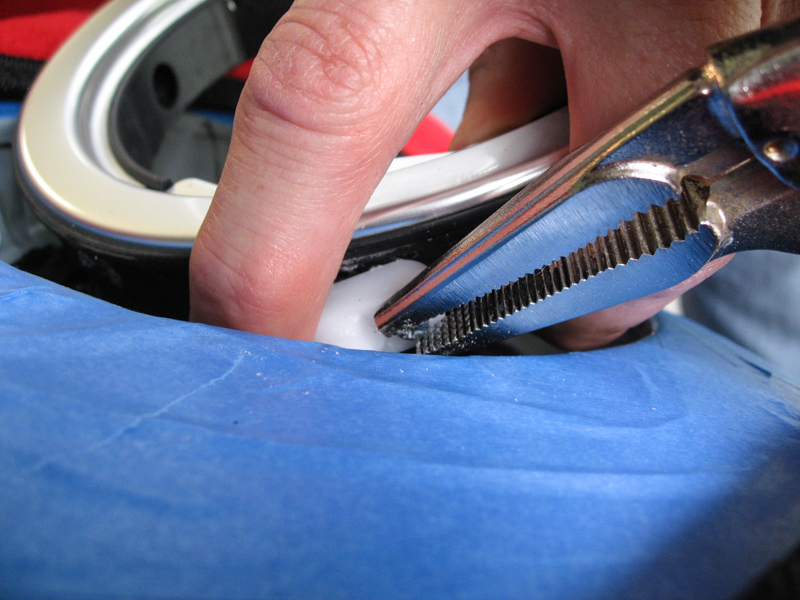
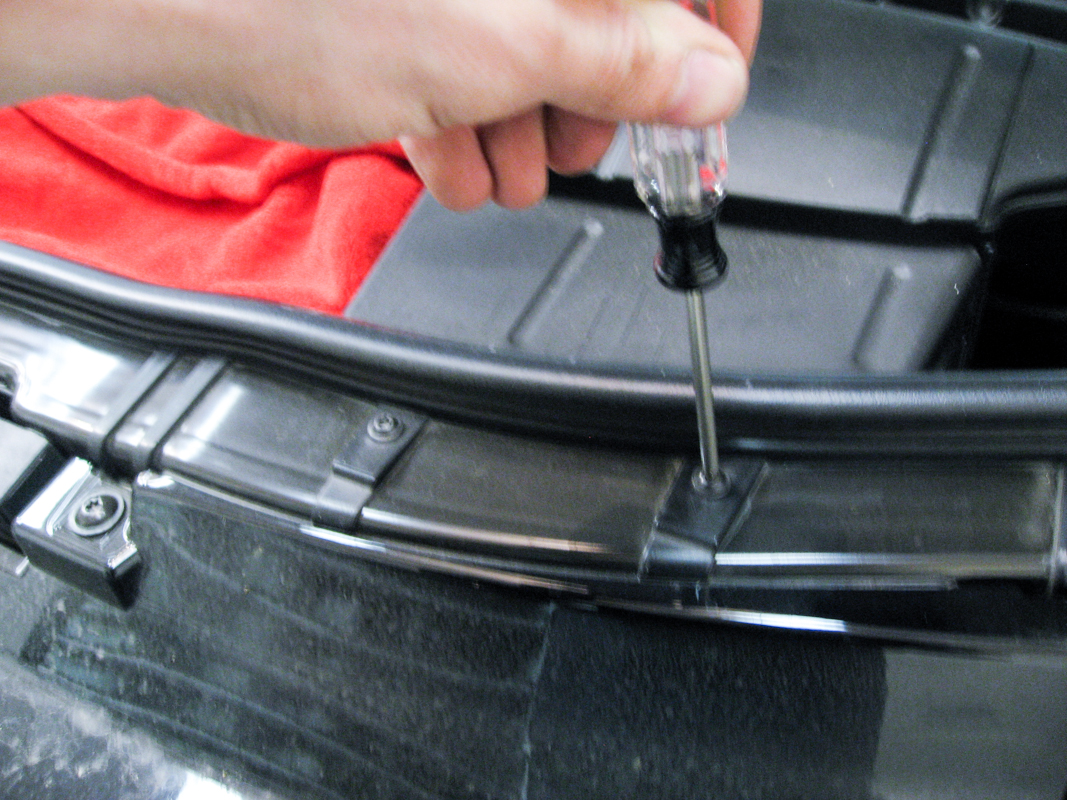
The next challenge is the cable release mechanism. On the mk1 the cable pulled out far enough to allow you to undo the screws holding it to the fuel door, on the mk2 not so much. You have two choices here... Open the trunk liner and undo the cable or take the screws out. We opted to take the screws out and after trying a couple of 90^ screwdrivers ended up just working them out with some vise grips... brute force but it worked :)
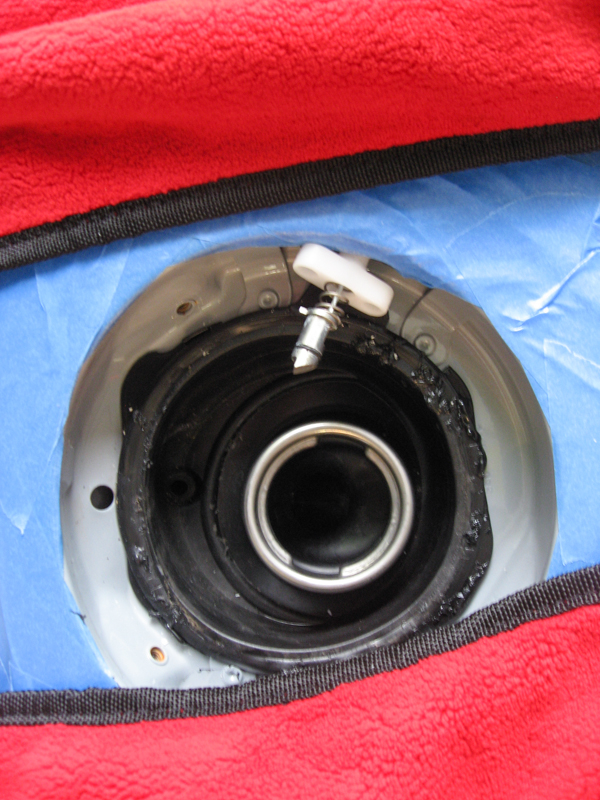
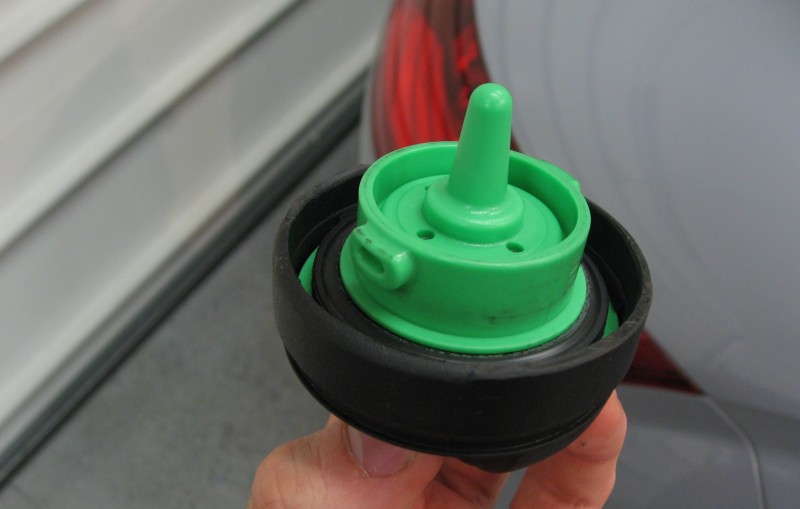
That should allow you to completely remove the fuel door. If you're just replacing it just follow the reverse steps to re-install. We were installing the protective bib though so on to the second part. As I mentioned above, we sourced some rubber sheet from Ace Hardware, about 4" x 8" x 1/16". The fuel filler neck is about 2" in diameter so you'll have to cut a hole in the rubber to fit it snugly around the neck. The top will need to be trimmed to clear the inside of the fuel neck too as it's a bit tight at the top. Take your time and trim the rubber so that you get sufficient protection but also so that it can still fold up and tuck under the door. Also, we needed to trim the tabs on the gascap that are used to hang the cap on the door. I don't really like hanging the cap on the door anyway since there's a chance it can scratch the door or slide off and hit the paint. Not a big loss to dremel those down.
Finally, here's a test fit with the bib in place snug around the fuel filler neck, it still needed to be trimmed a bit for length and width in order to tuck under the door at this point.
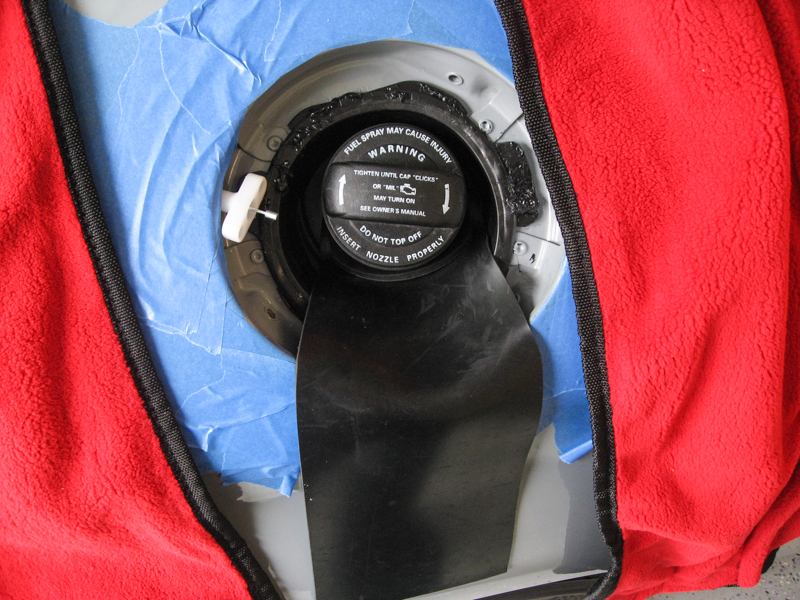
And with it folded up with room for the door to close.
Here was the original damage... This is available for sale if someone wants a spare door to paint, powdercoat, or wrap.
Removal of the door is trickier than I thought it would be. I had done the same replacement on my mk1 and that was a bit easier to deal with.
I prepped the area first to protect the paint and the fuel door, using 3M painters tape and a couple of Griots fender cover blankets.
There are three 3mm allen bolts holding the door to the body, three tabs that hold it down flush with the body and some of the famous black German body glue. The glue doesn't really do too much but one of the tabs needs to be retracted to release the cap.
Start with the three 3mm allen bolts first. These come out relatively easily, you may need to remove the gas cap to get the right angle on the top bolt. These were a bit rusty from exposure to fuel, even with just 18k miles on the car.
I was able to get a small pry tool in to start to lift the door but it was obviously held in place on both ends and wouldn't just lift out. To the front of the car is the tab that needs to be retracted and at the back is the release cable assembly. Here are the small rear tabs, if you open the door they are basically in line with the plastic inner trim, at about the 8 and 11 o'clock positions.
These along with the catch mechanism mean that the front edge has to come out first. To do that the retractable tab needs to be retracted :) If you look at the base of the hinge you can see the end of the tab that you pull on. It's designed to have a small hook tool inserted to pull it outwards which pulls the tab in away from the body. Here's a view looking down at the top, the tab does not stick out very far but there's really no way to force this out around the body.
I tried to pull the catch mechanism with a hook and that seemed to work ok but I ended up cutting a small allen key down to make something that was closer to the tool shown in the manual. On my first attempt I thought I had it pulled all the way out but the cap still wasn't free. I pushed it all the way back in and then pulled it back out and it released on the second try. Here you can see the catch from below.
Some gentle prying should lift the cap out now and you'll get a trail of the glue, it's pretty easy to clean up though.
The next challenge is the cable release mechanism. On the mk1 the cable pulled out far enough to allow you to undo the screws holding it to the fuel door, on the mk2 not so much. You have two choices here... Open the trunk liner and undo the cable or take the screws out. We opted to take the screws out and after trying a couple of 90^ screwdrivers ended up just working them out with some vise grips... brute force but it worked :)
That should allow you to completely remove the fuel door. If you're just replacing it just follow the reverse steps to re-install. We were installing the protective bib though so on to the second part. As I mentioned above, we sourced some rubber sheet from Ace Hardware, about 4" x 8" x 1/16". The fuel filler neck is about 2" in diameter so you'll have to cut a hole in the rubber to fit it snugly around the neck. The top will need to be trimmed to clear the inside of the fuel neck too as it's a bit tight at the top. Take your time and trim the rubber so that you get sufficient protection but also so that it can still fold up and tuck under the door. Also, we needed to trim the tabs on the gascap that are used to hang the cap on the door. I don't really like hanging the cap on the door anyway since there's a chance it can scratch the door or slide off and hit the paint. Not a big loss to dremel those down.
Finally, here's a test fit with the bib in place snug around the fuel filler neck, it still needed to be trimmed a bit for length and width in order to tuck under the door at this point.
And with it folded up with room for the door to close.
Tuesday, April 16, 2013
Tyrolsport shifter bracket bushing install
These solid brass bushings replace the three factory rubber bushings that hold the cable linkage bracket to the top of the transmission housing. I had a set of these on my mk1 and they provided just a tick more precision when combined with the solid cable ends. At $50 for the set from Tyrolsport it was a quick and cheap mod, and 100% reversible too.
This took about an hour from start to finish including all of the pics and some searching through the factory manual. No need to put the car in the air which is always nice but you are messing with your transmission so if you're not comfortable with this take it to a shop, it should just be an hour for the install.
Not many tools required for this one sadly, always more fun to have the entire toolbox empty :)
- T20 torx screwdriver
- 10mm socket
- 13mm socket
- 13mm combination wrench
- magnet tool
- ratchet wrenches and extensions
- wobble adapter
- channel locks (for hose clamps)
To start you'll need to remove the airbox. First remove the two T20 torx screws that secure the air scoop at the grill.
Then you can release the hose clamps for the intake hose and the DV recirc line. I find it easier to remove the DV from the throttle body end.

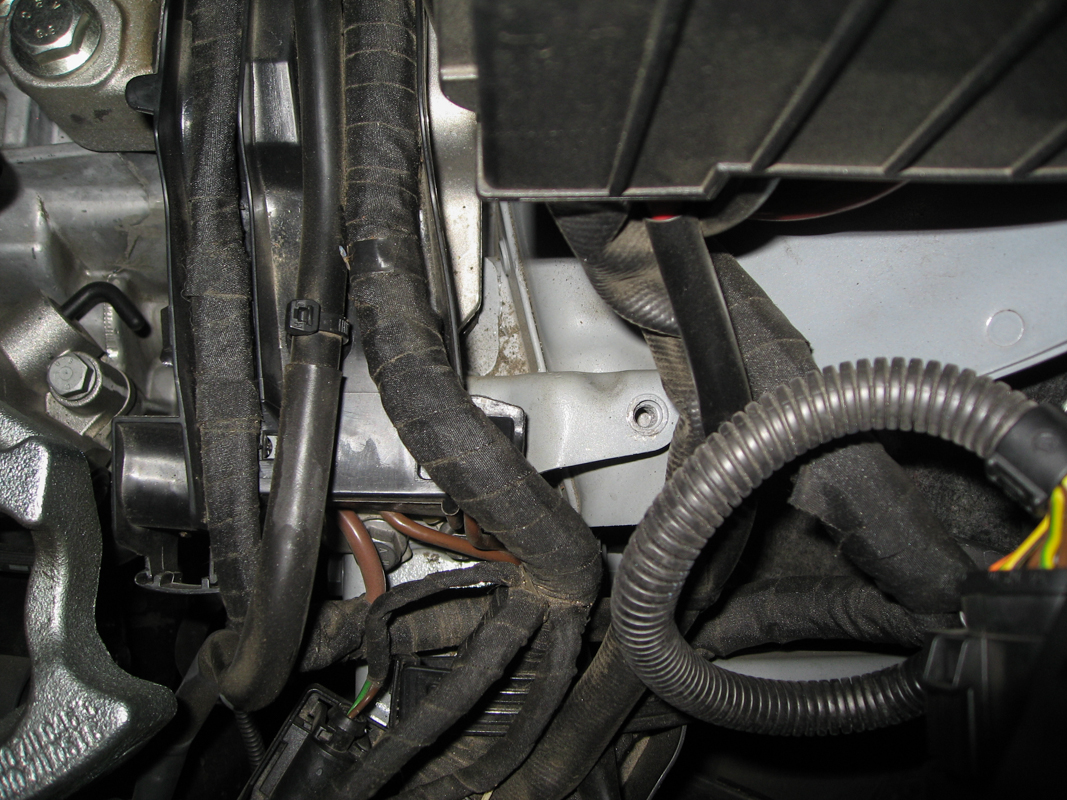
Then all that's left holding the airbox in place are two 10mm bolts. These are a bit of a reach so you'll need an extension and make sure you have a magnet tool on hand to get them out so you don't drop them. The forward one can be located between the airbox and the relay box tucked amongst some wires. The rear one is between the airbox and the firewall, secured on a small metal tab.
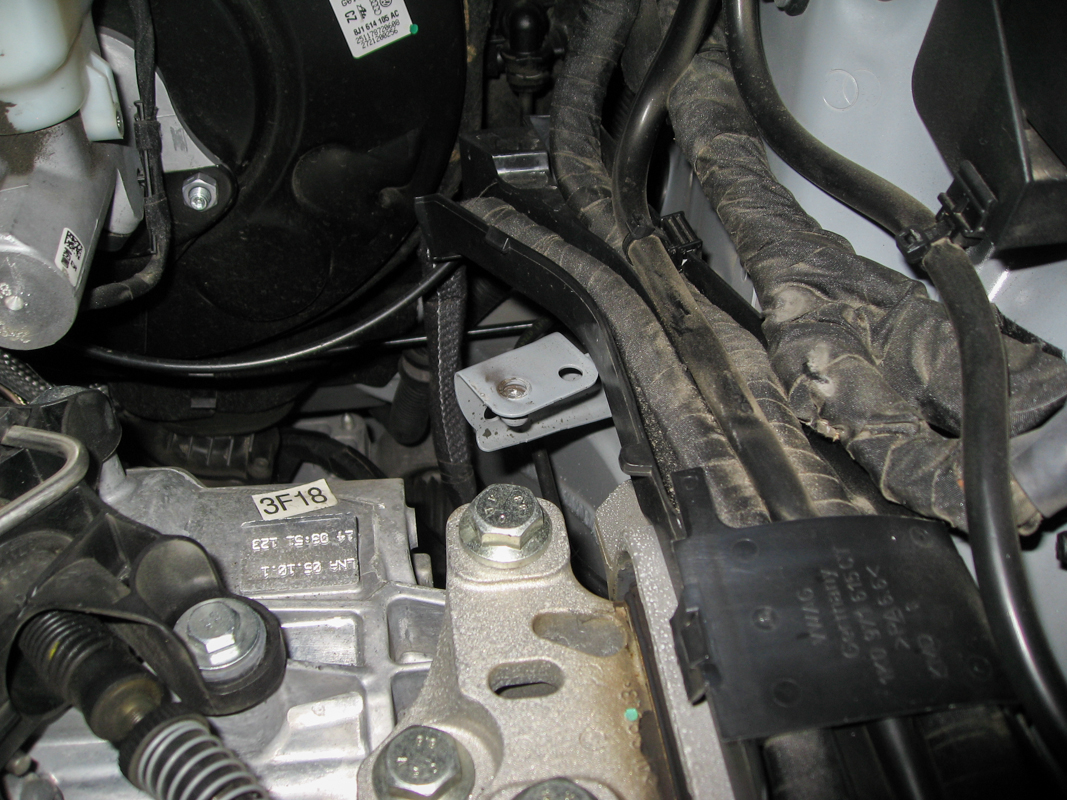
Pop the airbox up and set it aside. You can see your victim below it. The cable bracket is held in place with three 13mm bolts that are all fairly easy to access.
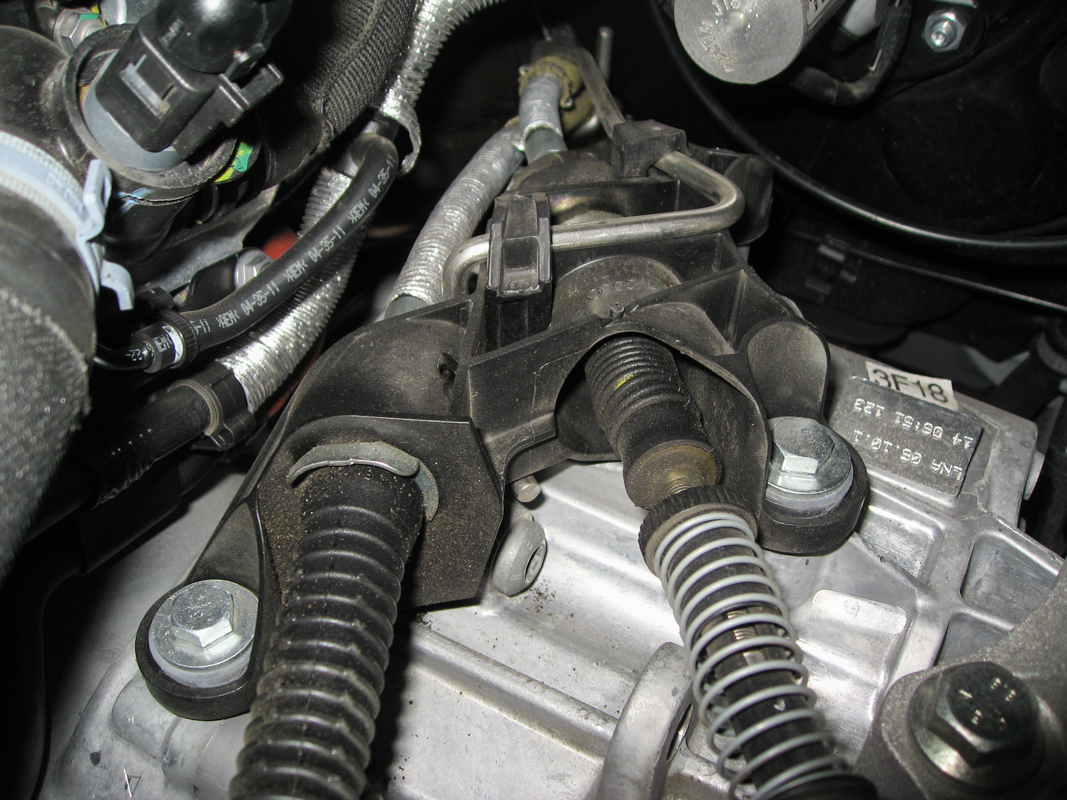
In theory since the bracket just acts as a cable guide removing the bolts and bushings should not affect your shift linkage adjustment. To be on the safe side I only ever removed two bolts at a time. There's enough slack here that even with one bolt still tight you can get the other two out. I started with the front two bolts. The first you have direct access to, the other it can help to have a wobble adapter so that you can work around a coolant line. Don't loosen the rear bolt at all at this point.
The factory bushings are comprised of a rubber grommet that has a metal insert. The insert pushes out through the bottom pretty easily. Some spray lube may help here but on my car everything came out pretty easily.
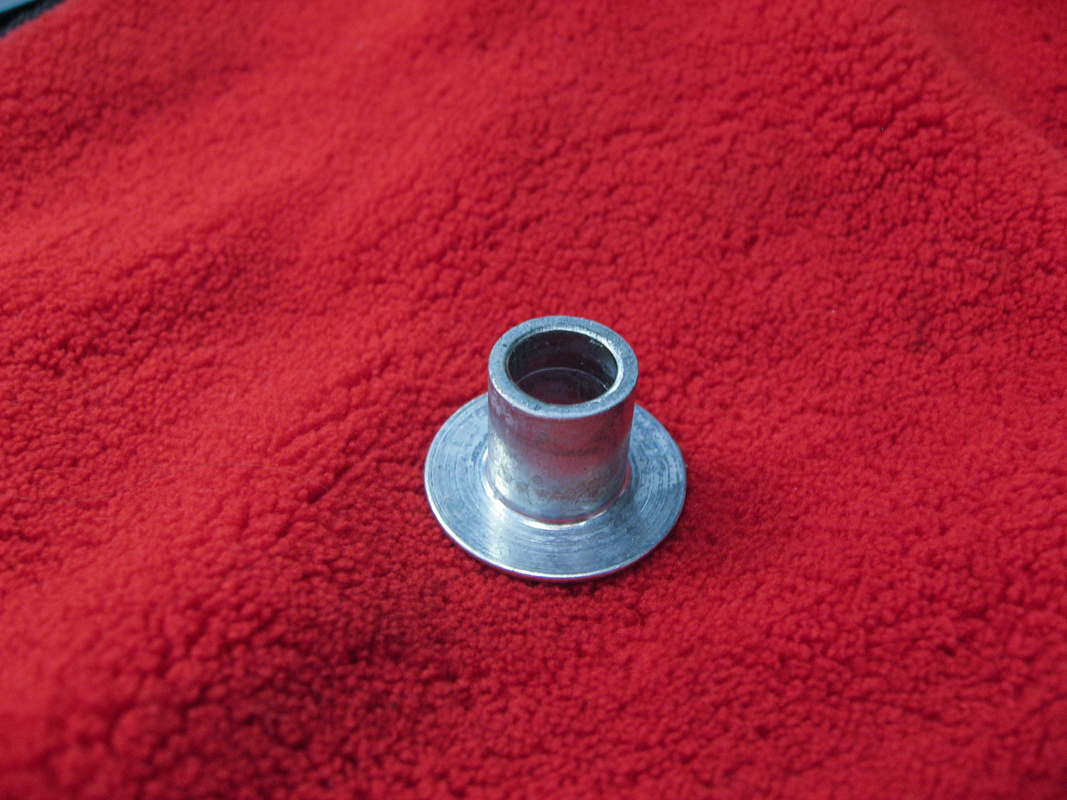
The grommet has a groove that fits onto the bracket so that takes a bit more effort to remove. You should be able to get one finger underneath and squeeze it into the hole while pulling from the top. These came out pretty easily for me but again, some silicone spray may help a bit. You can ramp that up to grabbing onto the rubber with channel locks to get more leverage but that may tear the rubber. Worst case you can cut them out but that should NOT be necessary.

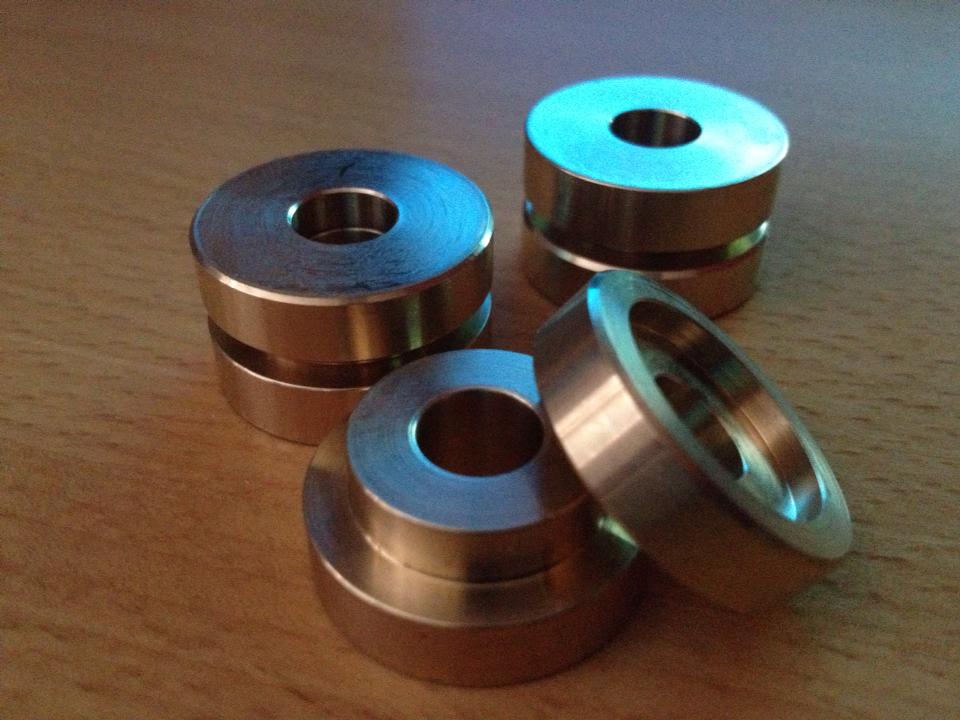
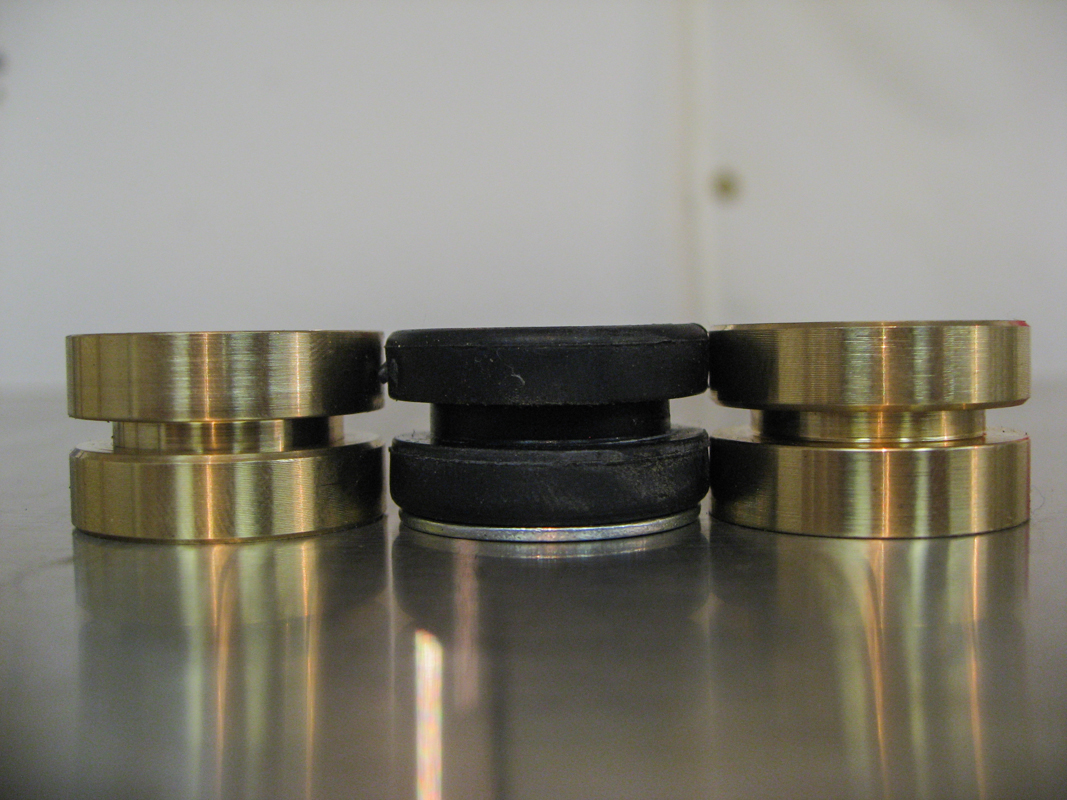
Here's a comparison shot. The Tyrolsport bushings are two piece and I couldn't find any thickness or orientation difference between them. In fact in this picture the left one has the "cap" on the bottom and the right one is reversed. I checked the thickness with calipers and they were identical. That said, when installing these they go in through the bottom with the "cap" on top. This ensures that the bushing slides into the bracket correctly and isn't wedged in place. Slide the first bushing in place in the hole nearest the engine. Hold off on installing the other bushing for now so that it doesn't accidentally drop out.
As I said earlier it's easier to work if you've got one bolt secured so go ahead and secure the bolt in the bushing closest to the engine. You'll want this to be just about tightened all the way, just a bit loose so that you can get the remaining bushing out. Note that it's safer to start these bolts by hand to avoid having them cross thread.
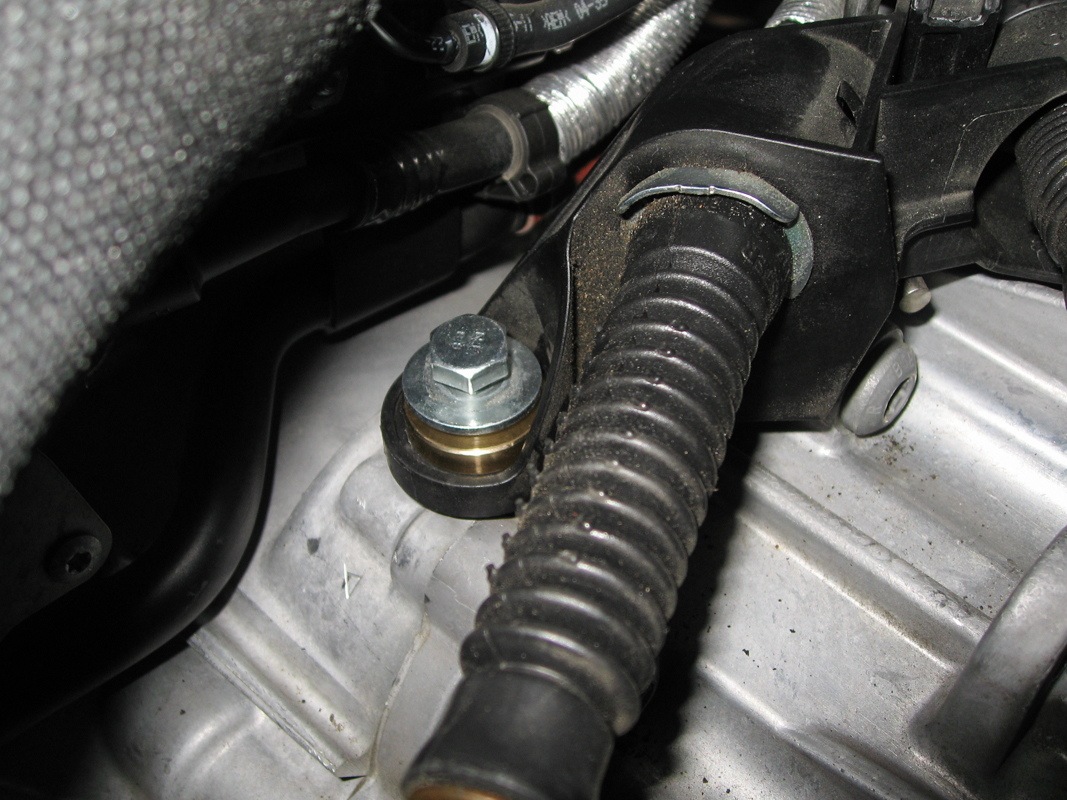
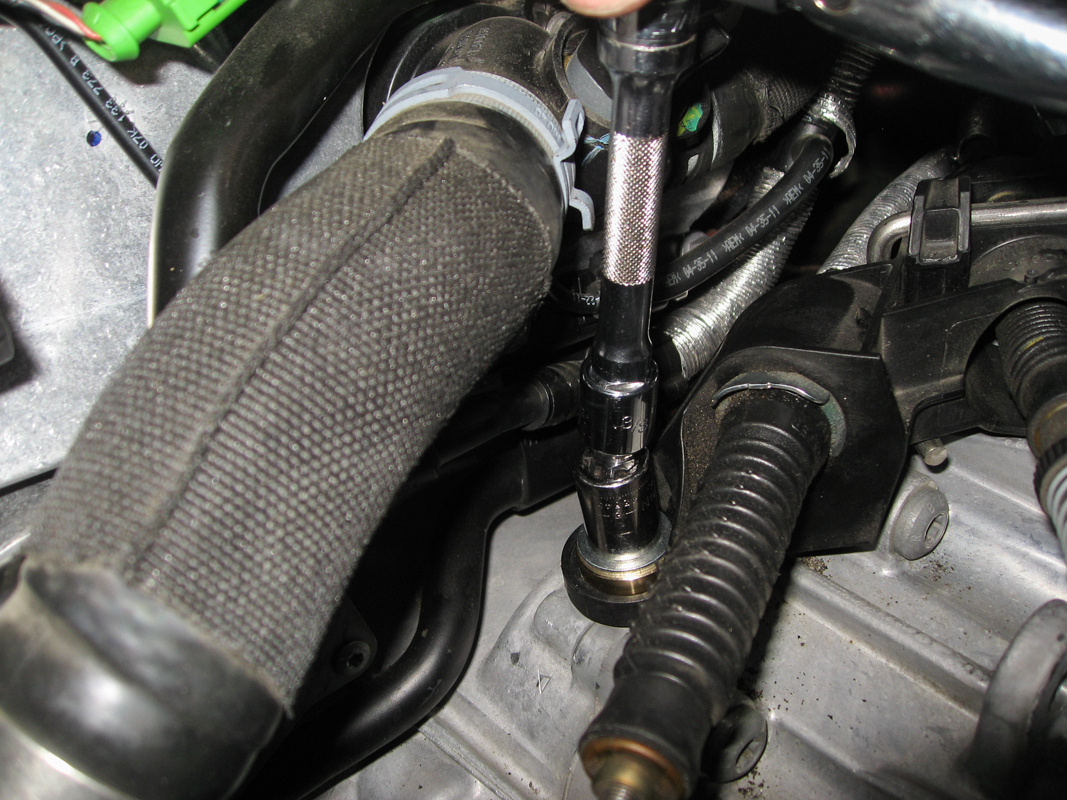
With that bushing secured you can now unbolt the rear bushing and remove it. The brake master cylinder is right above the bolt so you'll need to switch to a combination wrench here, at least they left enough space around the bolt head that a ratcheting wrench would fit :) Also note the length of the wrench I'm using, these bolts are not torqued very tight.

After removing the last bushing you can install the Tyrolsport bushings in the remaining two spots. Be sure to orient these the same way, with the "cap" on top. Thread the bolts back in by hand to get them started and then go ahead and tighten all three. I couldn't find torque specs for these in the manual but they weren't very tight; they're threaded into aluminum and are holding a plastic bracket so just use a short handled wrench and don't go nuts :)

Hop in the car and row through the gears to make sure everything is still smooth. If not check that the cables aren't hung up on anything and that the bracket is lined up correctly, shouldn't be a problem given the small tolerances on the Tyrolsport bushings.
Reinstall the airbox, carefully starting the 10mm bolts with a magnet tool, and refit the hoses and clamps and you're all done.
This took about an hour from start to finish including all of the pics and some searching through the factory manual. No need to put the car in the air which is always nice but you are messing with your transmission so if you're not comfortable with this take it to a shop, it should just be an hour for the install.
Not many tools required for this one sadly, always more fun to have the entire toolbox empty :)
- T20 torx screwdriver
- 10mm socket
- 13mm socket
- 13mm combination wrench
- magnet tool
- ratchet wrenches and extensions
- wobble adapter
- channel locks (for hose clamps)
To start you'll need to remove the airbox. First remove the two T20 torx screws that secure the air scoop at the grill.
Then you can release the hose clamps for the intake hose and the DV recirc line. I find it easier to remove the DV from the throttle body end.
Then all that's left holding the airbox in place are two 10mm bolts. These are a bit of a reach so you'll need an extension and make sure you have a magnet tool on hand to get them out so you don't drop them. The forward one can be located between the airbox and the relay box tucked amongst some wires. The rear one is between the airbox and the firewall, secured on a small metal tab.
Pop the airbox up and set it aside. You can see your victim below it. The cable bracket is held in place with three 13mm bolts that are all fairly easy to access.
In theory since the bracket just acts as a cable guide removing the bolts and bushings should not affect your shift linkage adjustment. To be on the safe side I only ever removed two bolts at a time. There's enough slack here that even with one bolt still tight you can get the other two out. I started with the front two bolts. The first you have direct access to, the other it can help to have a wobble adapter so that you can work around a coolant line. Don't loosen the rear bolt at all at this point.
The factory bushings are comprised of a rubber grommet that has a metal insert. The insert pushes out through the bottom pretty easily. Some spray lube may help here but on my car everything came out pretty easily.
The grommet has a groove that fits onto the bracket so that takes a bit more effort to remove. You should be able to get one finger underneath and squeeze it into the hole while pulling from the top. These came out pretty easily for me but again, some silicone spray may help a bit. You can ramp that up to grabbing onto the rubber with channel locks to get more leverage but that may tear the rubber. Worst case you can cut them out but that should NOT be necessary.
Here's a comparison shot. The Tyrolsport bushings are two piece and I couldn't find any thickness or orientation difference between them. In fact in this picture the left one has the "cap" on the bottom and the right one is reversed. I checked the thickness with calipers and they were identical. That said, when installing these they go in through the bottom with the "cap" on top. This ensures that the bushing slides into the bracket correctly and isn't wedged in place. Slide the first bushing in place in the hole nearest the engine. Hold off on installing the other bushing for now so that it doesn't accidentally drop out.
As I said earlier it's easier to work if you've got one bolt secured so go ahead and secure the bolt in the bushing closest to the engine. You'll want this to be just about tightened all the way, just a bit loose so that you can get the remaining bushing out. Note that it's safer to start these bolts by hand to avoid having them cross thread.
With that bushing secured you can now unbolt the rear bushing and remove it. The brake master cylinder is right above the bolt so you'll need to switch to a combination wrench here, at least they left enough space around the bolt head that a ratcheting wrench would fit :) Also note the length of the wrench I'm using, these bolts are not torqued very tight.
After removing the last bushing you can install the Tyrolsport bushings in the remaining two spots. Be sure to orient these the same way, with the "cap" on top. Thread the bolts back in by hand to get them started and then go ahead and tighten all three. I couldn't find torque specs for these in the manual but they weren't very tight; they're threaded into aluminum and are holding a plastic bracket so just use a short handled wrench and don't go nuts :)
Hop in the car and row through the gears to make sure everything is still smooth. If not check that the cables aren't hung up on anything and that the bracket is lined up correctly, shouldn't be a problem given the small tolerances on the Tyrolsport bushings.
Reinstall the airbox, carefully starting the 10mm bolts with a magnet tool, and refit the hoses and clamps and you're all done.
Monday, March 25, 2013
Unibrace UB-T install
I've seen a number of people on the mk1 TT forum install braces from Unibrace on mk4 R32s and mk5/mk6 GTIs and with the UB-T now available for the mk2 TT I needed to have one :)
The brace is really nicely made, high-quality powdercoat and the fitment with regards to aligning with the fasteners was spot on. If I had gotten the TTRS kit with the spacers that would have been perfect. I haven't had enough chance to really drive it to form any thoughts on handling improvements yet; the car maybe feels a bit stiffer through transitions but I need more time with it to really see as all I've done since install is some highway miles. Theoretically this will stiffen the unibody and help the car resist any sort of twisting, helping the suspension work better and maybe adding some responsiveness to the steering. This is really just the start of a series of mods I'll be doing to stiffen the car prior to installing the MSS kit later this summer.
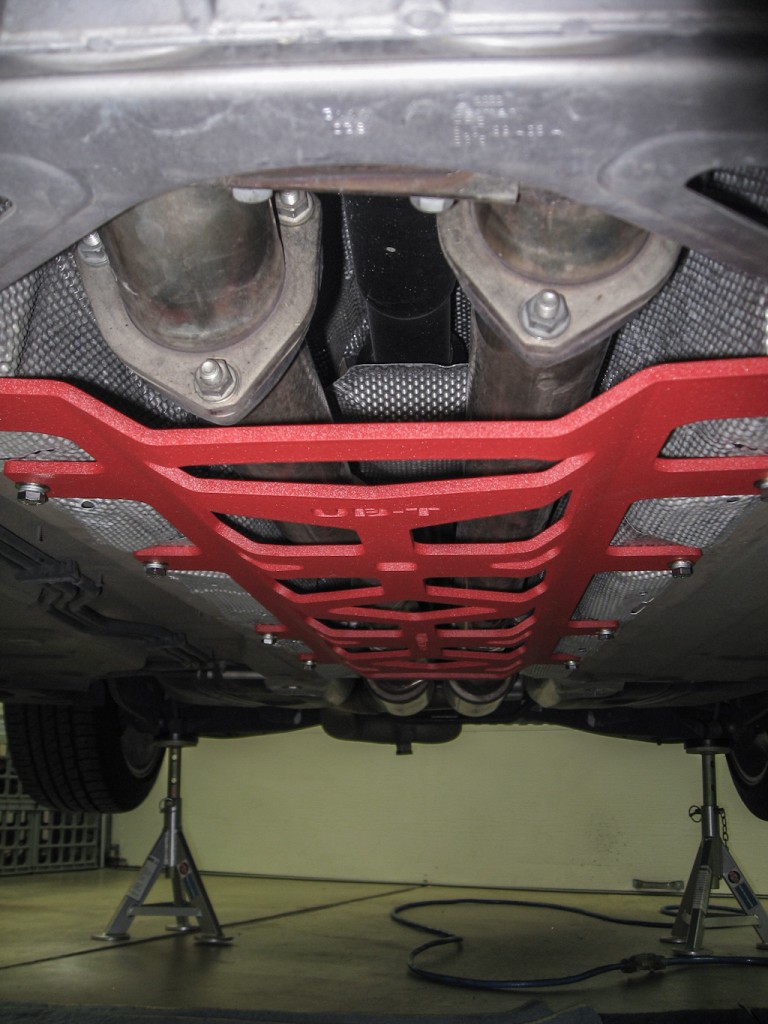
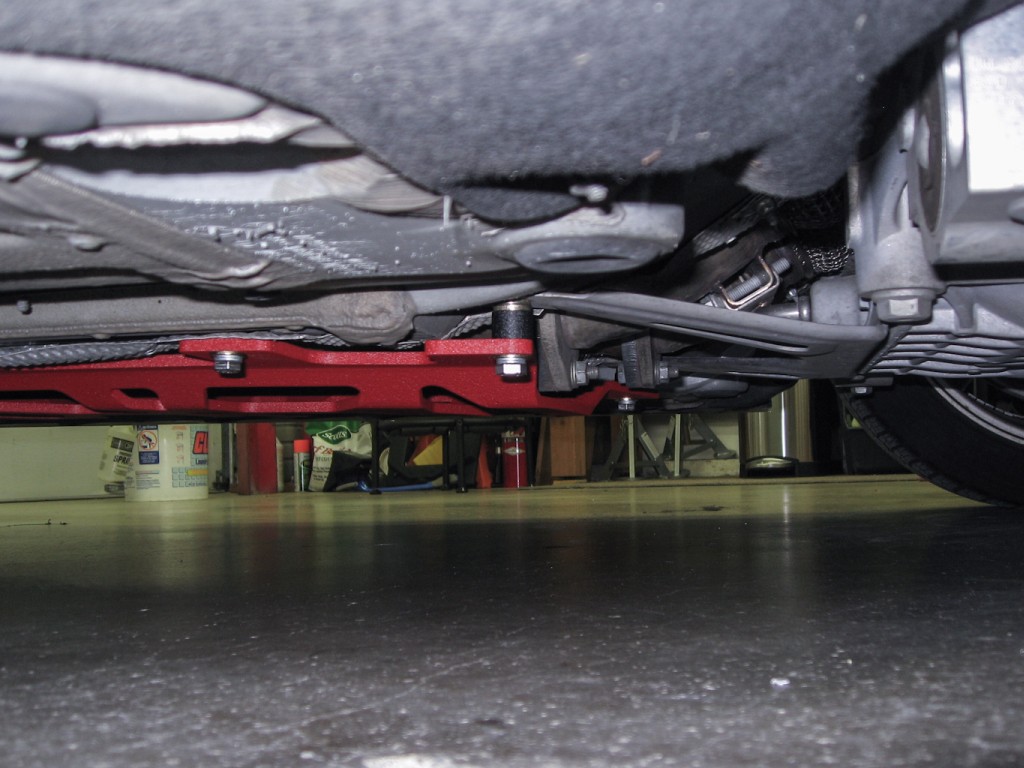
The brace bridges the transmission tunnel and ties in at 10 places using existing mounting holes for the heatshield in the transmission tunnel. It covers basically the entire tunnel except for maybe the final 6-8 inches before the resonators.
The TTRS specific kit includes additional spacers to help the brace clear the downpipe/cats that isn't required on the TT/TTS. I did not order these spacers since I run the Milltek cat-delete pipes but the brace made contact with the flange on the passenger side pipe. I used some grade 8 washers to space the brace down 1/4" and that worked fine, no rubbing or rattling. If you have the factory mid-cats, or you're running an aftermarket downpipe you'll definitely want to check with Bruce (who has been great to work with through the entire process) prior to ordering to make sure the UB-T will clear.
The part itself is very high quality 6061 aluminum. You can get them powdercoated either red or black and I chose red, because racecar. You can see it's a pretty large too, about 3ft long and 18" at the widest point.


The mod is pretty straightforward but it does require drilling holes in the floor and you'll need to have the car quite high off the ground in order to maneuver everything in place. The brace uses two factory bolt locations and then eight screws are replaced with Rivnuts and bolts. This does require some special tools to install the Rivnuts. We used a 1/2" drill bit to drill the holes and it wasn't quite enough so a 13mm or 17/32 would probably work better. Be careful though because some drill chucks won't accept a bit larger than 1/2". If you're using a 1/2" bit you can simply use a file or dremel to open the holes just a tick. It's also worth buying or renting a high quality Rivnut tool (M8 sized) for the install. You really want those torqued down correctly so that they don't spin which would require drilling the fasteners out.
On to the install, many thanks to Gokart3 for the assistance! Get the car up in the air high enough so that you can work underneath and have enough clearance to operate the drill and Rivnut tool. BE VERY CAREFUL DOING THIS. The mk2 TT is not easy to get up on four jack stands so if you're not comfortable with this take it to a shop, it should only be about an hour to install on a lift. Also, while you can probably do this alone there are a couple of places where it's really very helpful to have a second set of hands (as Gokart3 helped out when I didn't have the nerve to drill into my car ;)
Once the car is safely in the air you can remove the front two bolts that hold the exhaust hanger tabs in place. These are 13mm bolts and should remove easily.
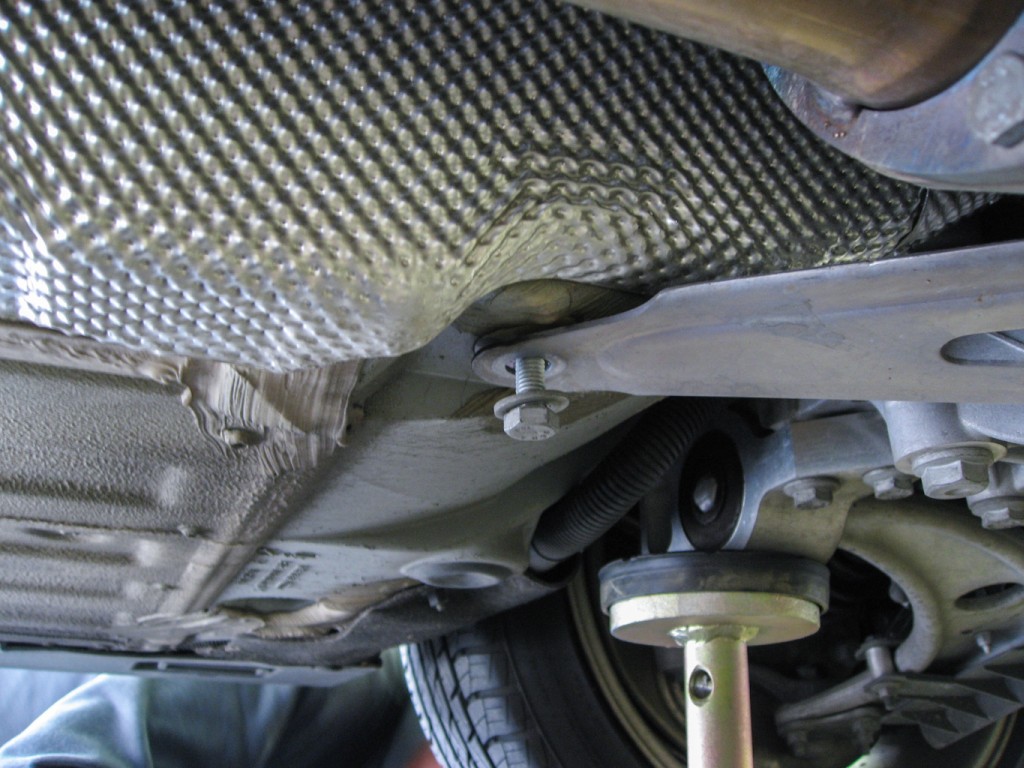
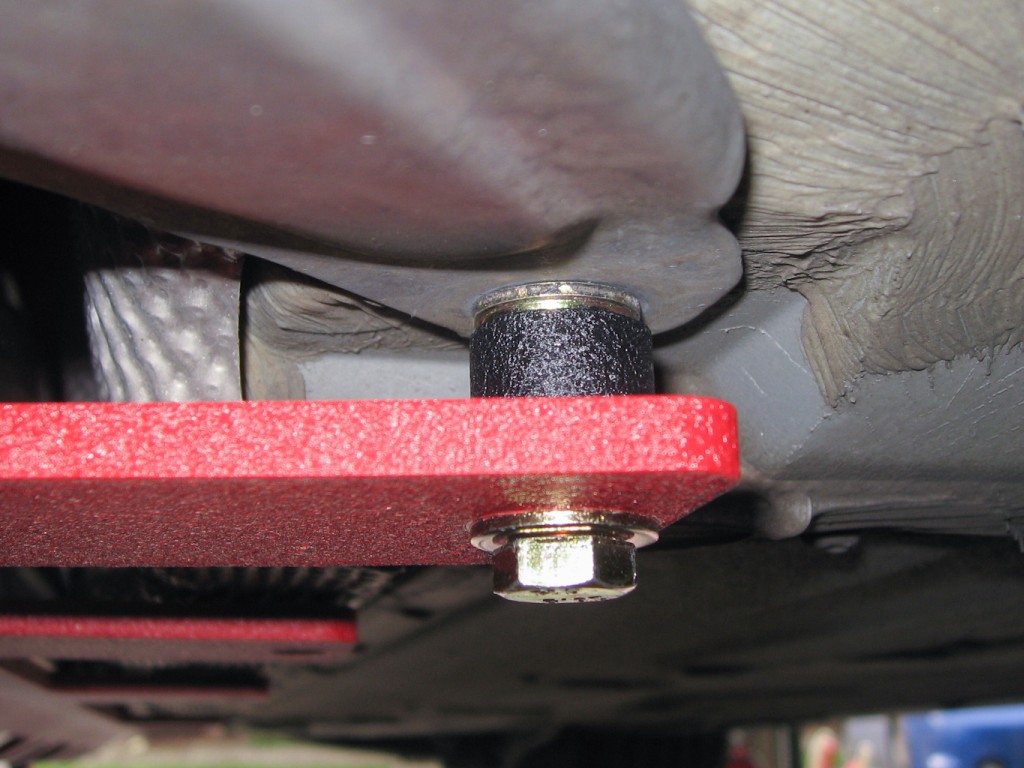
With both of those removed you can get the UB-T in place with the front two bolts (at the front of the car) to see how everything lines up. Here you can see the black powdercoated spacer that comes with the brace along with a few washers to space it low enough to clear the downpipe flange. You can tighten these two bolts until they are snug, careful not to cross-thread, and the brace is stiff enough to hang in place to check the rest of the fitment prior to drilling.
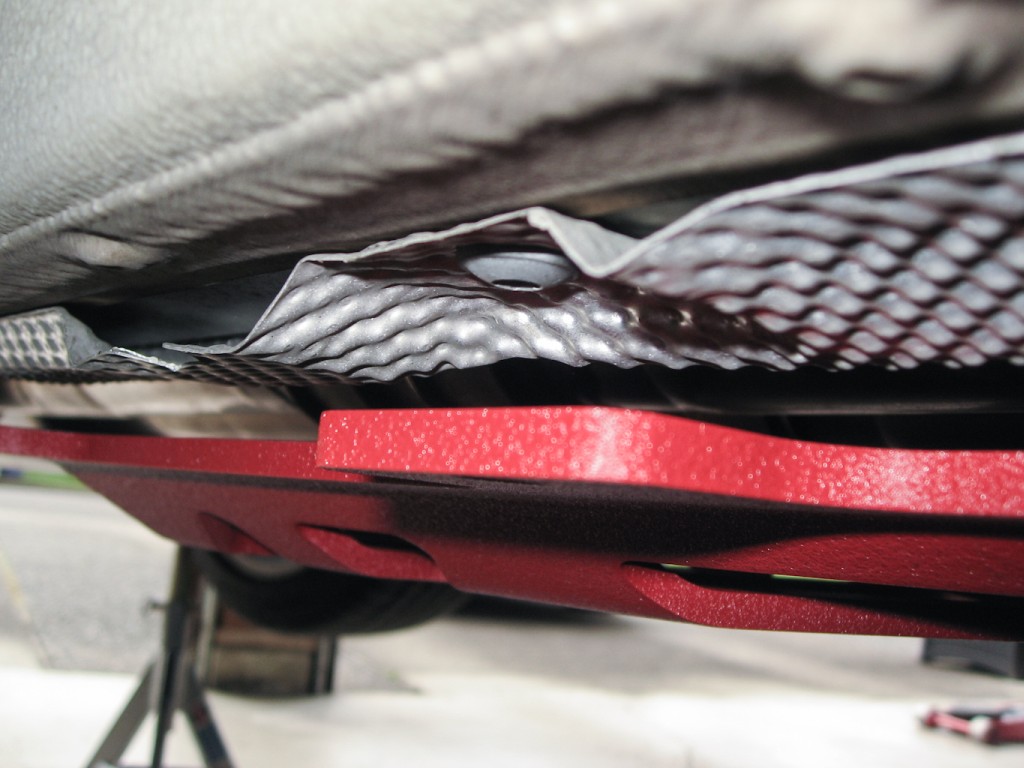
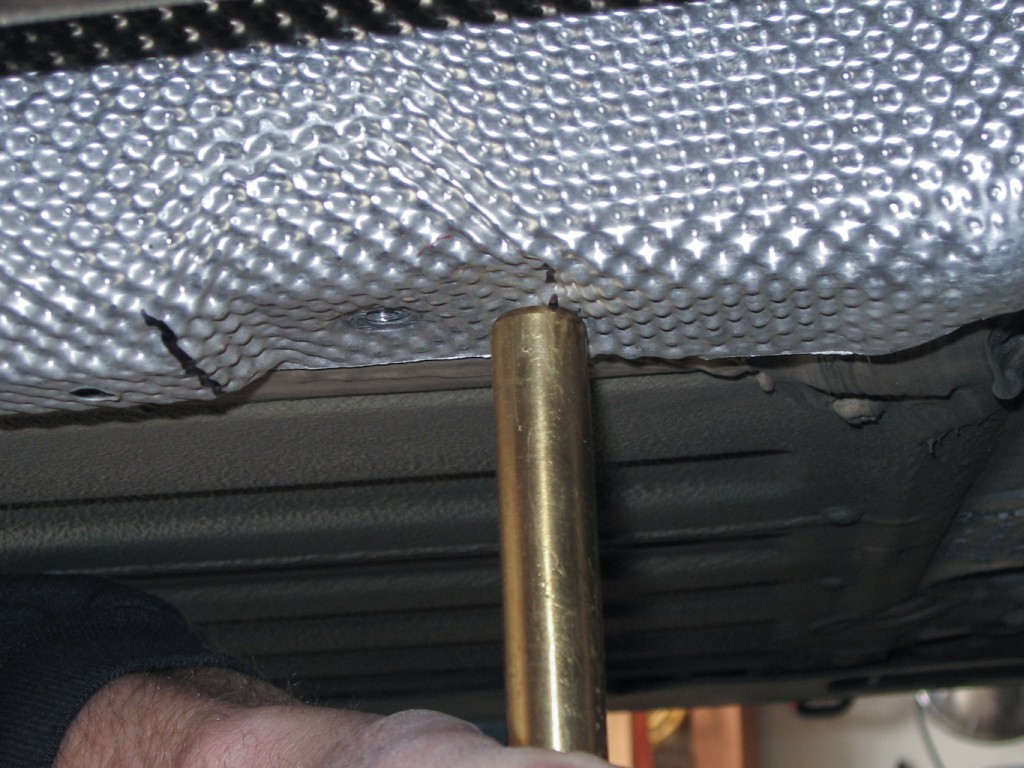
On my car the heat shield was interfering with the fit and I'm sure had I just drilled the holes the shield would have bent into shape but we chose to bend it first. We traced around the places where the shield was in the way and
used a plastic dead-blow hammer and a brass drift to bend the shield back.
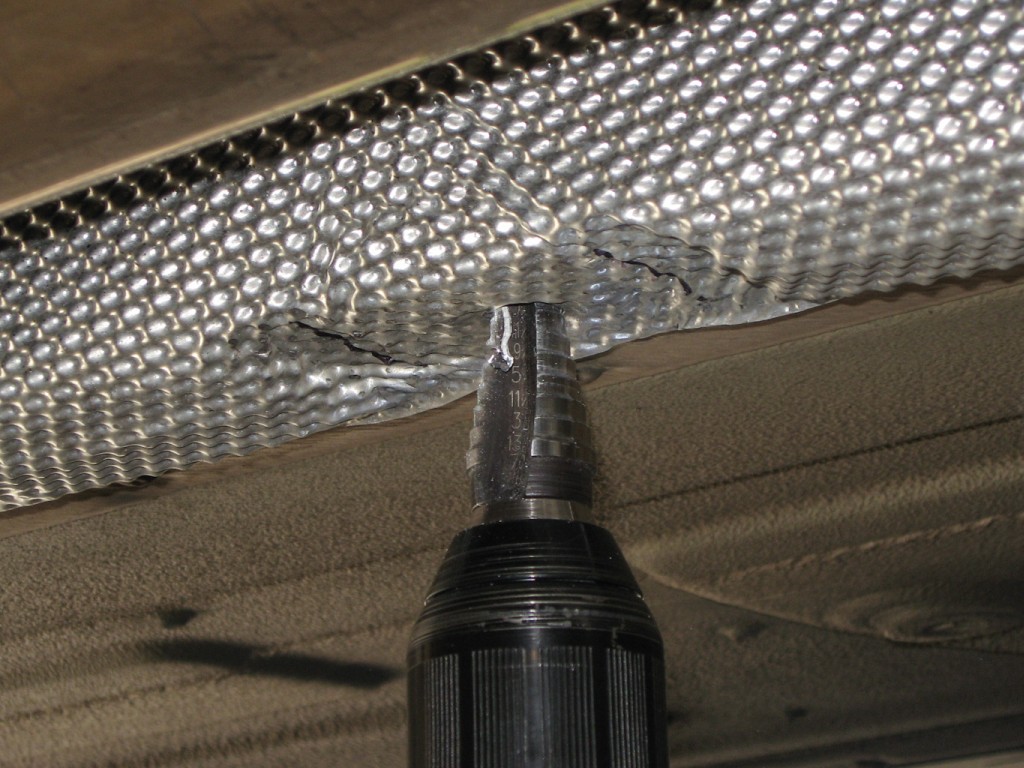
Now the brace should fit flush up against the body and you can check the other 8 holes all line up correctly. For me they were all dead on, but the holes in the brace are slightly oversized to give some range of adjustment as needed. Drop the brace out of the way and remove the eight T30 torx screws. These were very tight on my car, I think they're probably self tapping, so make sure you use a good quality bit to avoid stripping any of the heads. Once they're out you can drill out each hole. You want these to be as close as possible to the size of the Rivnuts so that the Rivnut can get as much bite as possible on the body. We used a stepped bit marked at 1/2" but as I mentioned above a 17/32 would be a better fit and a 13mm might be as well. Since 1/2" wasn't quite enough we used a file to slowly open up each hole, test fitting often, to make sure that we didn't get the holes too oversized. Drilling into your car can be a bit nerve-wracking so consult an expert if you're not comfortable with this.
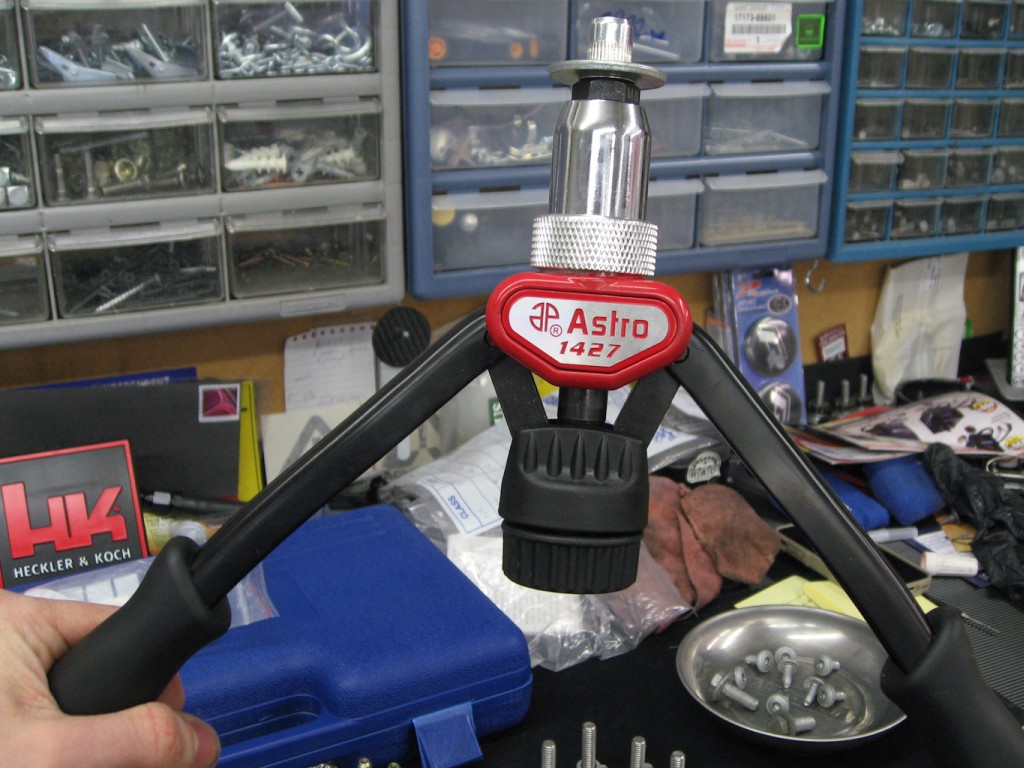
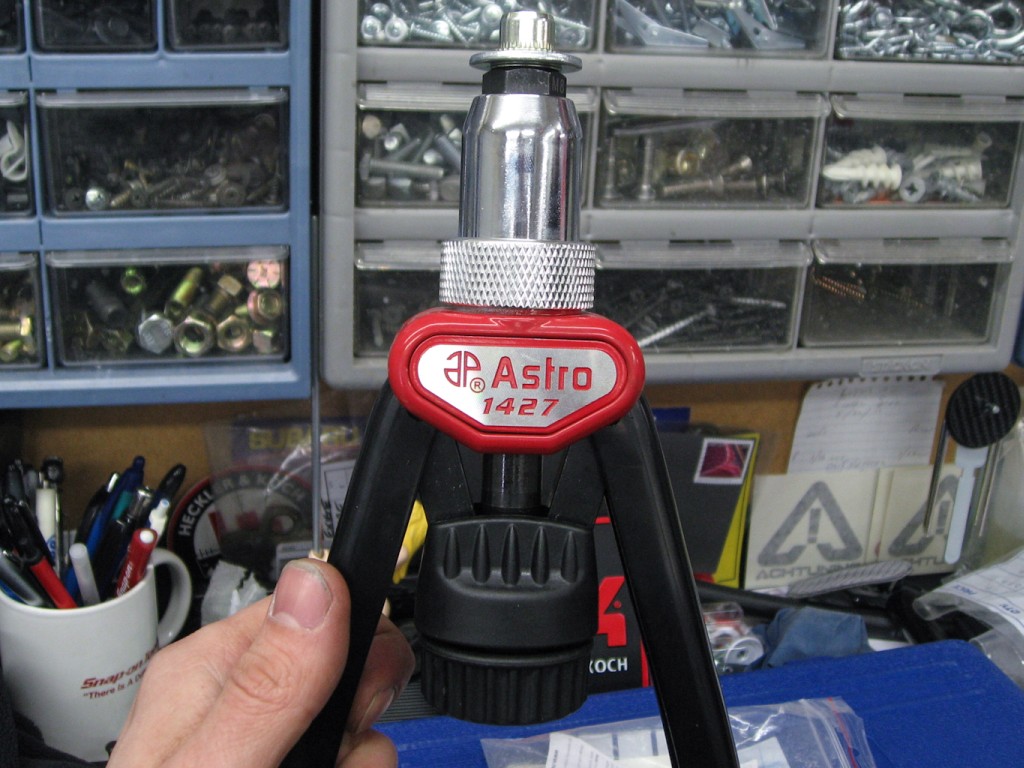
Next it's time to install the Rivnuts. I had never worked with these before but I knew there were some potential issues with not getting them seated correctly or in tight enough where they could spin in place and leave you unable to get the bolt in or out. There are several ways to install these from using the supplied bolts to crush the Rivnut to several other hand tools. I searched around and found several positive reviews for the Astro-Pneumatic 1427 which was available on Amazon Prime (2 day shipping FTW! :) I liked this style tool because it does not put excess stress on the threads and the way the handle is setup allows you to get quite a lot of leverage. We did a test fit of one of the spare Rivnuts (the kit comes with 10 but you only use eight) to see how the tool worked, and also to see what would happen if it was overtightened.
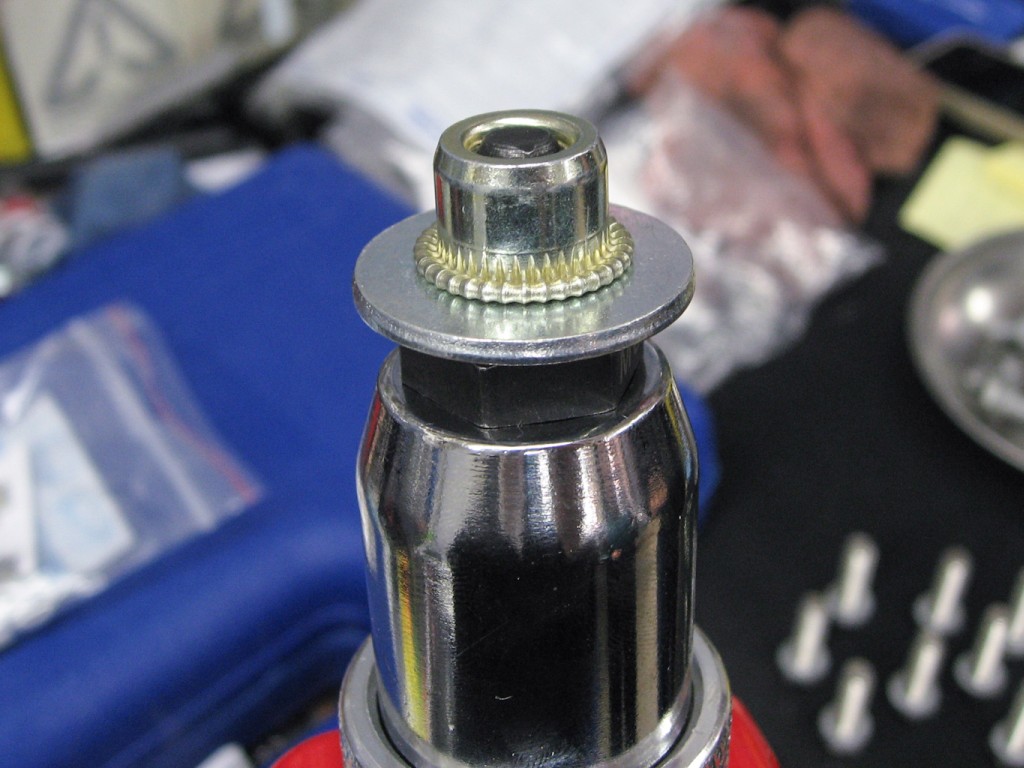
Here's the placement of the Rivnut on the tool with the threads just level with the tool insert. Here I used a washer to simulate the body, the thickness is close to the aluminum unibody.

With the threads at that depth the handles start out angled down a bit which allows you to get a good start with decent leverage.
You want to tighten it all the way in the first shot, then back it off a bit and re-tighten to make sure it's clamped all the way. Don't go full gorilla spec on this though as you don't want to pull the threads out of the Rivnut or cause it to crack. You can tell pretty easily when it's tight enough.
And when you're done here's what you're left with, nicely crushed, tight against the washer and the threads unharmed.
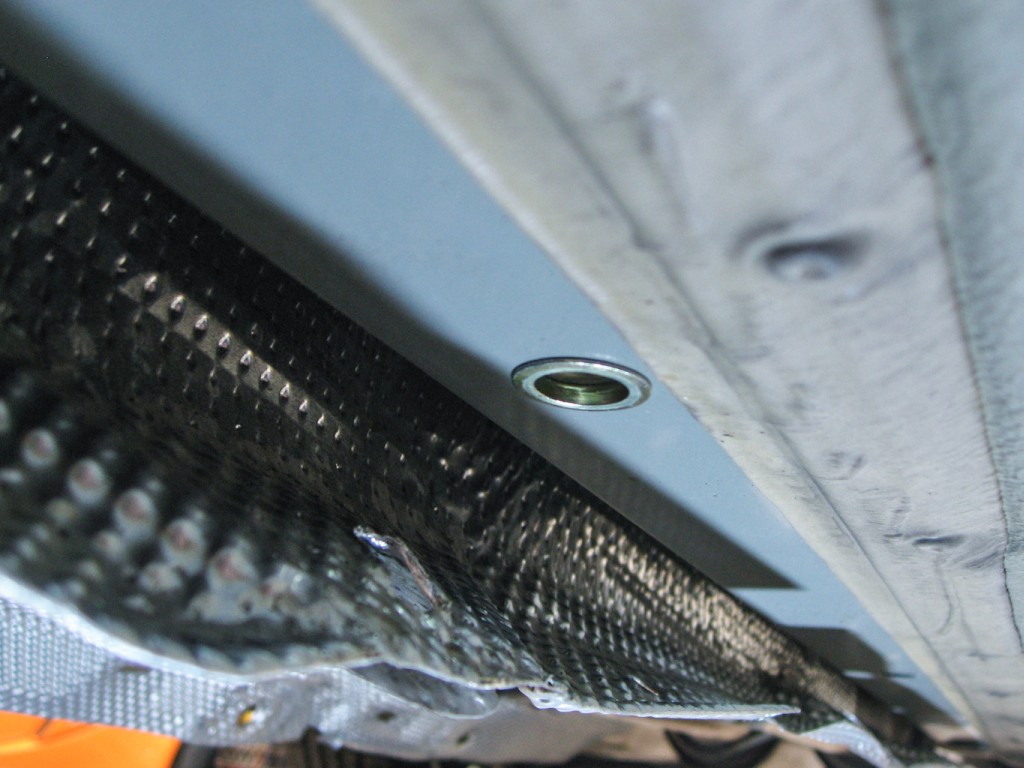
Ok, so that's enough practice. On to the real thing! Get the Rivnut setup on the tool as before and insert into the body. Note that while we drilled through the heat shield for the actual Rivnut install we bent the shield back out of the way and installed straight to the body. This is important for the Rivnut to be fully compressed against the body.
Here's where it helps to have a second set of hands. Have one person press upwards to make sure the Rivnut is inserted all the way up flush with the body, not angled at all, while the second person compresses the handles.
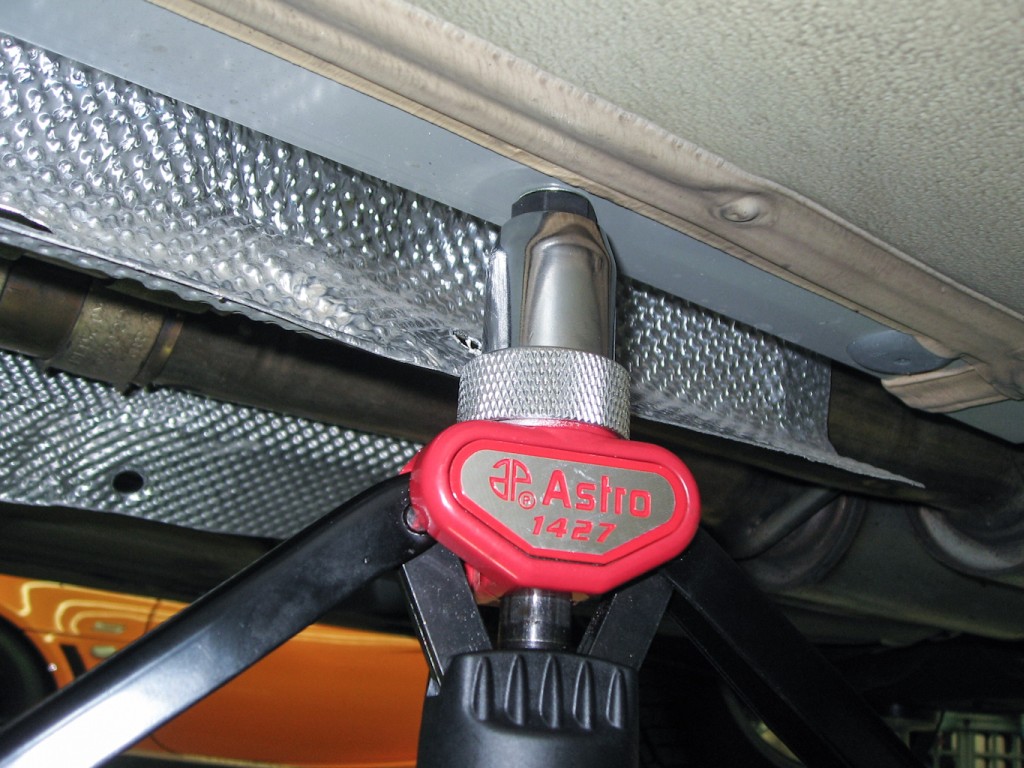
When you're done you get a nicely installed fastener that really looks OEM.
With all eight Rivnuts in place the hard part is done. Simply roll the heatshield back into place and reassemble. Start with the front two again, with the correct spacers and washers correctly located, and get them tight enough to help hold the brace in place but not so tight that you can't maneuver it. Get the rest of the bolts started by hand with the spacers and washers in place. You want to do all of this by hand to make sure nothing cross threads. Also, you'll want to install the bolts with just a bit of medium-strength loctite blue to keep them from vibrating out. Once all 10 bolts are in place you can tighten everything up. I didn't have torque specs but used a fairly short wrench with a 6" long handle to tighten these. Remember you're using stainless steel bolts into the Rivnuts and you really don't want to tear any threads out so don't overdo it. These aren't load bearing, you just don't want them to back out.
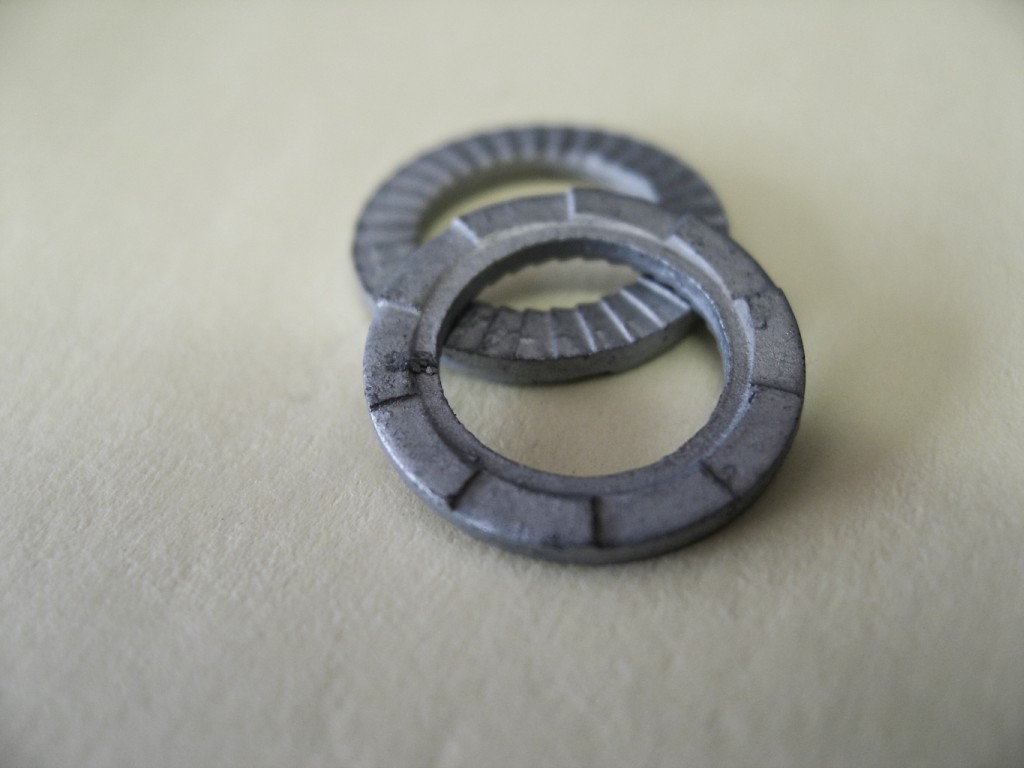
I went with a little extra insurance and used Nordlock washers but that's probably overkill. These use a cam system (shown face up in the foreground) that makes it impossible for the bolt to come loose. You can google for the details, they're very cool but spendy.
I was a little concerned about clearance all around but you can see that its actually pretty good. The extra 1/4" shim gets just enough clearance at the flange without the secondary cats in place.

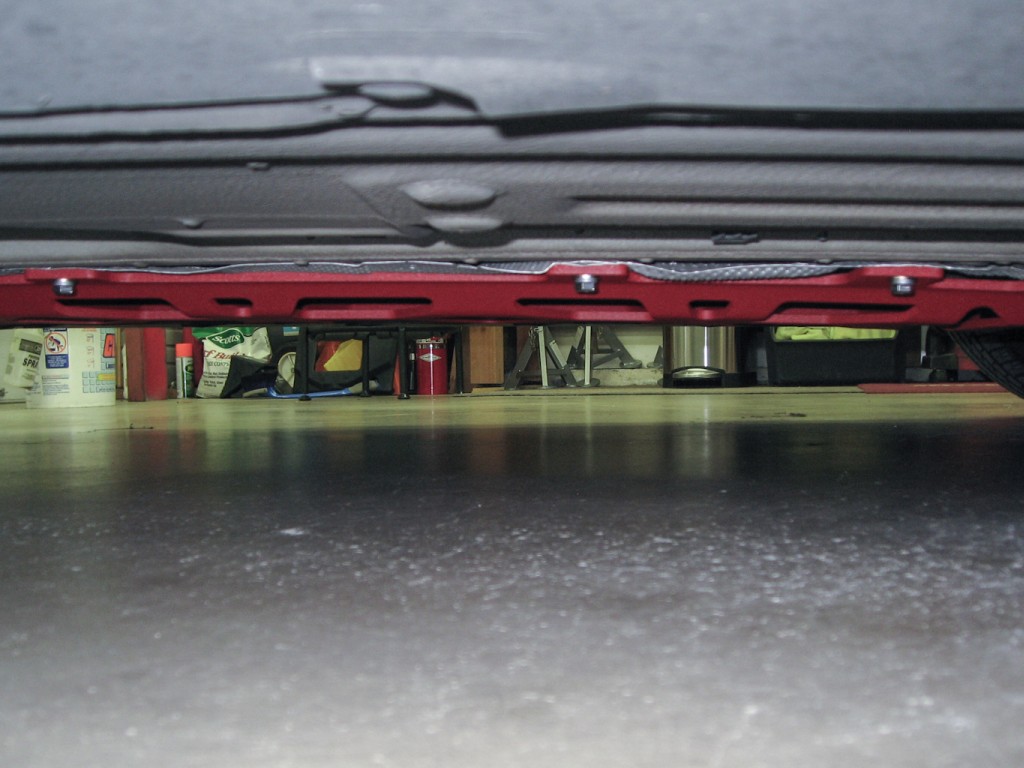
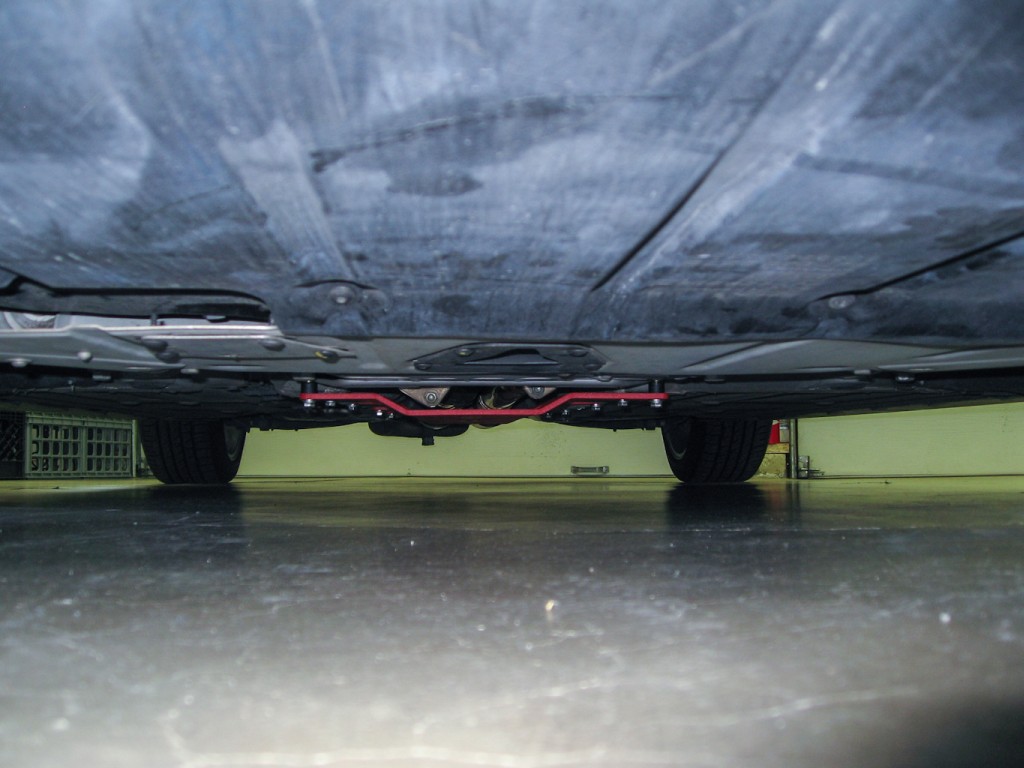
I've also got some pictures with the car on the ground. From straight level across the bottom of the car it hangs about 1.25" lower than the body. When viewed from the front it doesn't really seem too low. There are a couple of steep driveways that I need to see how close it gets but the stock ride height on the TTRS really gives a ton of clearance so I'm not too worried. If you've got H&R springs that might be a bit tight since they lower over an inch.
The brace is really nicely made, high-quality powdercoat and the fitment with regards to aligning with the fasteners was spot on. If I had gotten the TTRS kit with the spacers that would have been perfect. I haven't had enough chance to really drive it to form any thoughts on handling improvements yet; the car maybe feels a bit stiffer through transitions but I need more time with it to really see as all I've done since install is some highway miles. Theoretically this will stiffen the unibody and help the car resist any sort of twisting, helping the suspension work better and maybe adding some responsiveness to the steering. This is really just the start of a series of mods I'll be doing to stiffen the car prior to installing the MSS kit later this summer.
The brace bridges the transmission tunnel and ties in at 10 places using existing mounting holes for the heatshield in the transmission tunnel. It covers basically the entire tunnel except for maybe the final 6-8 inches before the resonators.
The TTRS specific kit includes additional spacers to help the brace clear the downpipe/cats that isn't required on the TT/TTS. I did not order these spacers since I run the Milltek cat-delete pipes but the brace made contact with the flange on the passenger side pipe. I used some grade 8 washers to space the brace down 1/4" and that worked fine, no rubbing or rattling. If you have the factory mid-cats, or you're running an aftermarket downpipe you'll definitely want to check with Bruce (who has been great to work with through the entire process) prior to ordering to make sure the UB-T will clear.
The part itself is very high quality 6061 aluminum. You can get them powdercoated either red or black and I chose red, because racecar. You can see it's a pretty large too, about 3ft long and 18" at the widest point.
The mod is pretty straightforward but it does require drilling holes in the floor and you'll need to have the car quite high off the ground in order to maneuver everything in place. The brace uses two factory bolt locations and then eight screws are replaced with Rivnuts and bolts. This does require some special tools to install the Rivnuts. We used a 1/2" drill bit to drill the holes and it wasn't quite enough so a 13mm or 17/32 would probably work better. Be careful though because some drill chucks won't accept a bit larger than 1/2". If you're using a 1/2" bit you can simply use a file or dremel to open the holes just a tick. It's also worth buying or renting a high quality Rivnut tool (M8 sized) for the install. You really want those torqued down correctly so that they don't spin which would require drilling the fasteners out.
On to the install, many thanks to Gokart3 for the assistance! Get the car up in the air high enough so that you can work underneath and have enough clearance to operate the drill and Rivnut tool. BE VERY CAREFUL DOING THIS. The mk2 TT is not easy to get up on four jack stands so if you're not comfortable with this take it to a shop, it should only be about an hour to install on a lift. Also, while you can probably do this alone there are a couple of places where it's really very helpful to have a second set of hands (as Gokart3 helped out when I didn't have the nerve to drill into my car ;)
Once the car is safely in the air you can remove the front two bolts that hold the exhaust hanger tabs in place. These are 13mm bolts and should remove easily.
With both of those removed you can get the UB-T in place with the front two bolts (at the front of the car) to see how everything lines up. Here you can see the black powdercoated spacer that comes with the brace along with a few washers to space it low enough to clear the downpipe flange. You can tighten these two bolts until they are snug, careful not to cross-thread, and the brace is stiff enough to hang in place to check the rest of the fitment prior to drilling.
On my car the heat shield was interfering with the fit and I'm sure had I just drilled the holes the shield would have bent into shape but we chose to bend it first. We traced around the places where the shield was in the way and
used a plastic dead-blow hammer and a brass drift to bend the shield back.
Now the brace should fit flush up against the body and you can check the other 8 holes all line up correctly. For me they were all dead on, but the holes in the brace are slightly oversized to give some range of adjustment as needed. Drop the brace out of the way and remove the eight T30 torx screws. These were very tight on my car, I think they're probably self tapping, so make sure you use a good quality bit to avoid stripping any of the heads. Once they're out you can drill out each hole. You want these to be as close as possible to the size of the Rivnuts so that the Rivnut can get as much bite as possible on the body. We used a stepped bit marked at 1/2" but as I mentioned above a 17/32 would be a better fit and a 13mm might be as well. Since 1/2" wasn't quite enough we used a file to slowly open up each hole, test fitting often, to make sure that we didn't get the holes too oversized. Drilling into your car can be a bit nerve-wracking so consult an expert if you're not comfortable with this.
Next it's time to install the Rivnuts. I had never worked with these before but I knew there were some potential issues with not getting them seated correctly or in tight enough where they could spin in place and leave you unable to get the bolt in or out. There are several ways to install these from using the supplied bolts to crush the Rivnut to several other hand tools. I searched around and found several positive reviews for the Astro-Pneumatic 1427 which was available on Amazon Prime (2 day shipping FTW! :) I liked this style tool because it does not put excess stress on the threads and the way the handle is setup allows you to get quite a lot of leverage. We did a test fit of one of the spare Rivnuts (the kit comes with 10 but you only use eight) to see how the tool worked, and also to see what would happen if it was overtightened.
Here's the placement of the Rivnut on the tool with the threads just level with the tool insert. Here I used a washer to simulate the body, the thickness is close to the aluminum unibody.
With the threads at that depth the handles start out angled down a bit which allows you to get a good start with decent leverage.
You want to tighten it all the way in the first shot, then back it off a bit and re-tighten to make sure it's clamped all the way. Don't go full gorilla spec on this though as you don't want to pull the threads out of the Rivnut or cause it to crack. You can tell pretty easily when it's tight enough.
And when you're done here's what you're left with, nicely crushed, tight against the washer and the threads unharmed.
Ok, so that's enough practice. On to the real thing! Get the Rivnut setup on the tool as before and insert into the body. Note that while we drilled through the heat shield for the actual Rivnut install we bent the shield back out of the way and installed straight to the body. This is important for the Rivnut to be fully compressed against the body.
Here's where it helps to have a second set of hands. Have one person press upwards to make sure the Rivnut is inserted all the way up flush with the body, not angled at all, while the second person compresses the handles.
When you're done you get a nicely installed fastener that really looks OEM.
With all eight Rivnuts in place the hard part is done. Simply roll the heatshield back into place and reassemble. Start with the front two again, with the correct spacers and washers correctly located, and get them tight enough to help hold the brace in place but not so tight that you can't maneuver it. Get the rest of the bolts started by hand with the spacers and washers in place. You want to do all of this by hand to make sure nothing cross threads. Also, you'll want to install the bolts with just a bit of medium-strength loctite blue to keep them from vibrating out. Once all 10 bolts are in place you can tighten everything up. I didn't have torque specs but used a fairly short wrench with a 6" long handle to tighten these. Remember you're using stainless steel bolts into the Rivnuts and you really don't want to tear any threads out so don't overdo it. These aren't load bearing, you just don't want them to back out.
I went with a little extra insurance and used Nordlock washers but that's probably overkill. These use a cam system (shown face up in the foreground) that makes it impossible for the bolt to come loose. You can google for the details, they're very cool but spendy.
I was a little concerned about clearance all around but you can see that its actually pretty good. The extra 1/4" shim gets just enough clearance at the flange without the secondary cats in place.
I've also got some pictures with the car on the ground. From straight level across the bottom of the car it hangs about 1.25" lower than the body. When viewed from the front it doesn't really seem too low. There are a couple of steep driveways that I need to see how close it gets but the stock ride height on the TTRS really gives a ton of clearance so I'm not too worried. If you've got H&R springs that might be a bit tight since they lower over an inch.
Subscribe to:
Posts (Atom)