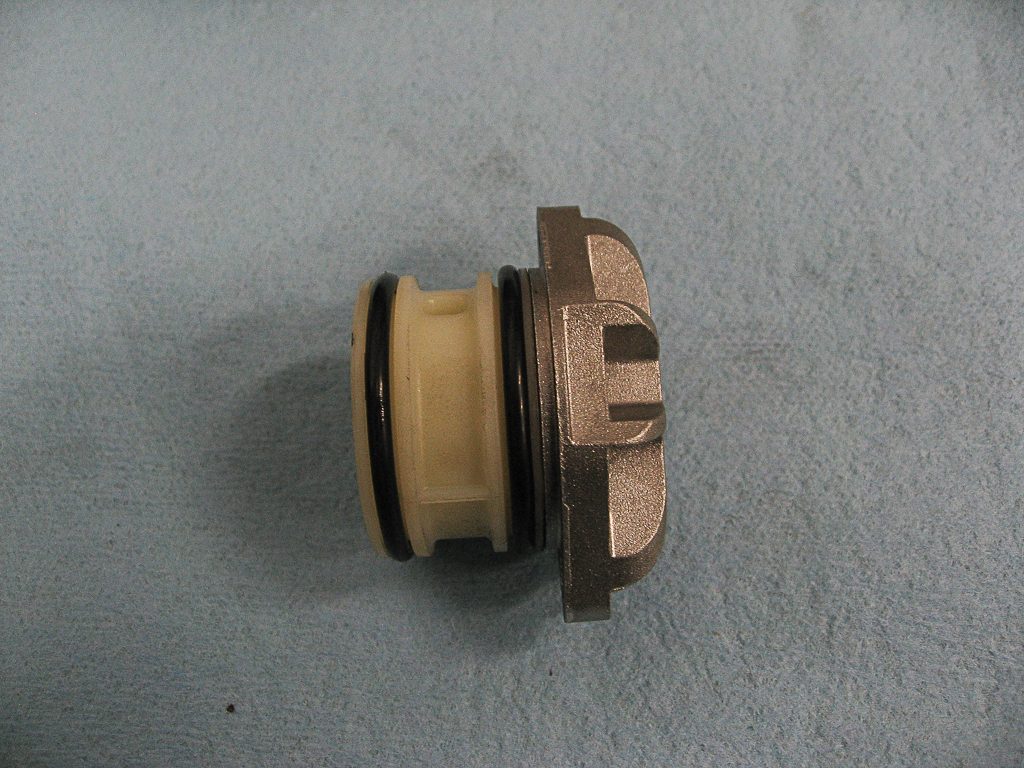
I sourced the filter from Neuspeed since you can't get it from Audi. Other shops also sell it but make sure that if you have a TT with Gen4 Haldex that you get the correct Gen4 filter. The Gen2 filter is completely different. If your filter cover plate looks like the one in the photos below then you need the Gen4 filter.
You will need a couple of special tools for this, or at least to make it a little easier.
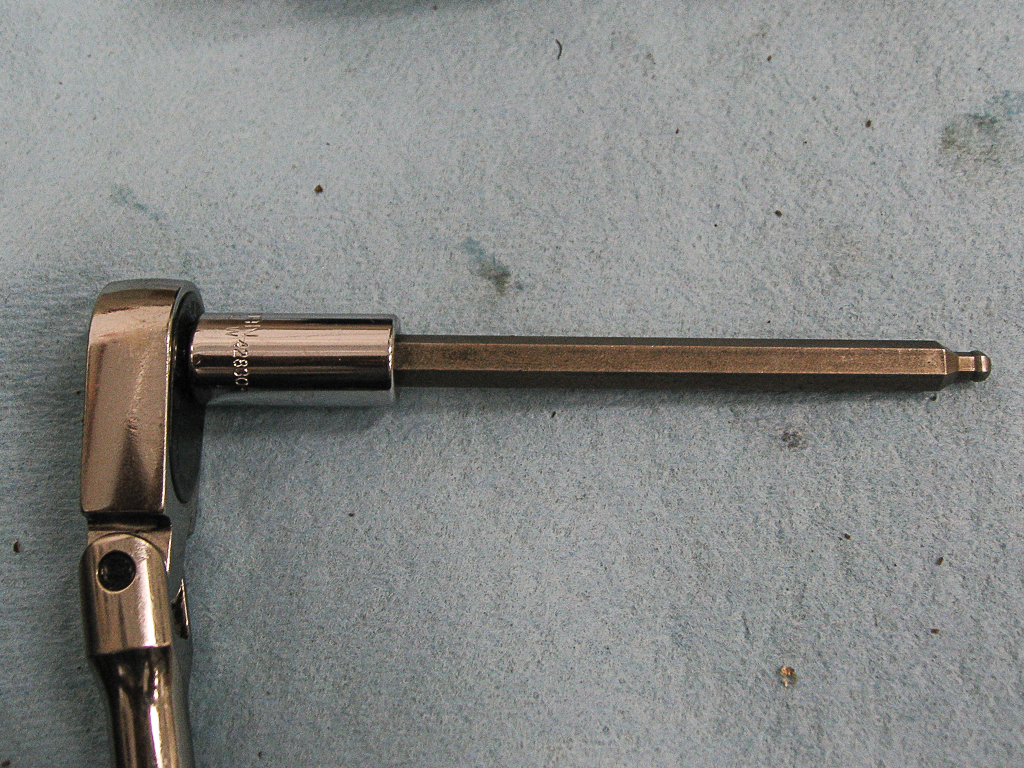
4mm extended wobble tip allen socket (shown below)
5mm allen socket
vise grips
small pick tool
wood screw
eye dropper or syringe
brake clean, towels and drip pan
Here's the socket:
Once the car is safely secured on jack stands you'll be able to find the filter location on the passenger side of the Haldex diff right next to the exhaust and tucked in close to the fuel tank. You should be able to replace the filter without dropping the exhaust. Here you can see the Haldex pump housing and a the top that little plastic bit sticking out (just right of center) is the filter. The second pic is the plate that covers it.


The plate is held on by two 4mm allen screws and you'll see that with the limited access that the wobble socket will come in handy.
It's worth showing a few pics of how the filter is assembled inside of the Haldex housing so you can see what you're dealing with once the cover plate is removed.
First up is the white spacer/seal that sits between the filter and the plate. This has two o-rings to seal against the filter housing. It has a small nipple protruding from the top that fits into a corresponding hole in the cover plate. Then finally that white spacer sits on top of the filter itself and the top of the filter recessed into the bottom of the spacer.
Note that if you're reading the other guy's review he shows a metal spacer, that was actually a crush washer for something else and is not part of the Haldex filter.


So that white spacer is probably the worst part of this. It's recessed into the housing and with two o-rings it seals very tightly and that plastic nipple will break right off if you try to use it to pull the filter out (I tried). The other writeup suggests using a wood screw, threaded into the endcap to pry against. DerTT sends a top tip that the T25 torx screws that are common fasteners on Audis (like the front undertray) also fit perfectly for this application.
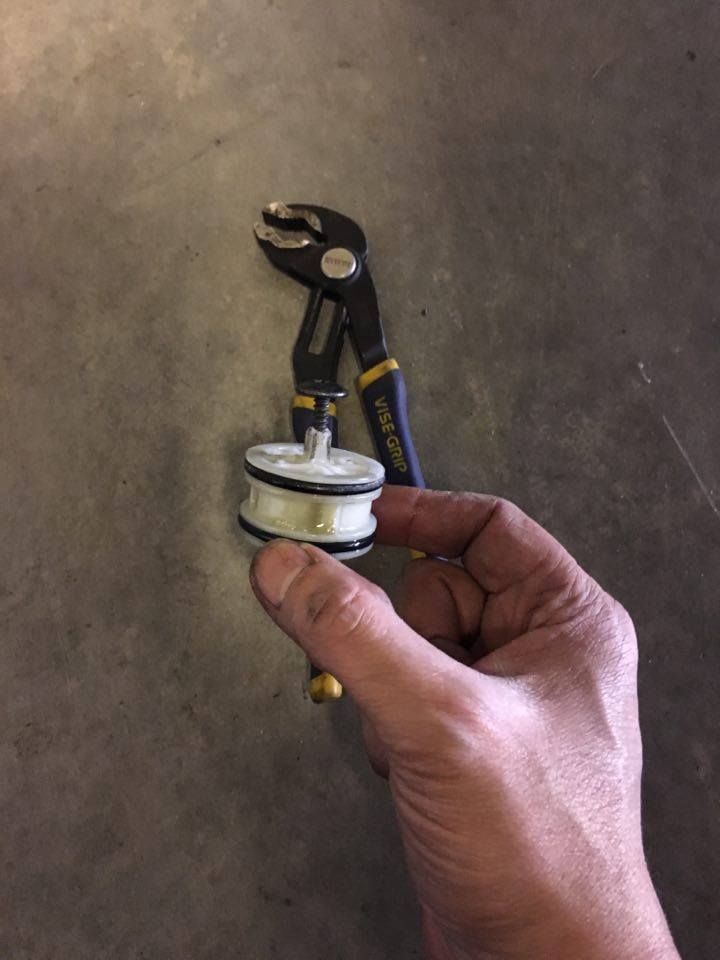
Make sure it's threaded in far enough to get a good bite and then use a small pair of vise grips to grab onto the screw and lever that against the Haldex housing and slowly turn the spacer until it comes out.
You'll possibly lose some Haldex fluid during this process and the stuff is very slick and messy so be ready with the drip pan.
The filter may come out with the spacer since it fits into the hole in the bottom. Mine did not. I used a small pick tool to reach into the housing and slide the filter out. It's not in there tight but it's in far enough that I was not able to grab it and the Haldex fluid is ridiculously slippery.
With the old filter out you can bench assemble the new filter and spacer and get ready for reassembly. When reinstalling you want to have the filter securely seated into the bottom of the spacer as you slide them into the Haldex. Make sure you apply Haldex fluid liberally to the o-rings on the spacer to help slide it in and keep them from tearing. In my case this spacer did not want to slide in at all. It's very tight and I believe builds up air pressure behind it. I opened the Haldex fill plug (5mm allen) in an attempt to relieve that pressure but I'm not sure it helped.
Eventually you'll get them seated into the Haldex and the spacer will be sitting just flush with the housing and not recessed as it was when you started. That's ok. When you put the cover plate back on it'll push the filter the rest of the way in. So go ahead and position the plate and replace the two 4mm allen screws. I don't have torque specs for those but they're small and easily stripped so use common sense.
I lost about an ounce of Haldex fluid during the swap and since I wasn't replacing all of the fluid I used a small syringe to add back about an ounce of fluid from a fresh bottle of Haldex fluid. If you're swapping fluid with the filter you won't have to worry about that.
That's about all there is to it. Like I said, not terribly difficult once you know the tricks but even the mk1 Haldex filter is easier to replace and that's saying something! :)
1 comment:
Best done using the VCDS
Post a Comment